How to set it up?
Canva is so easy and user-friendly that you could probably just try it out, and you could make a great design without any instructions. But, thanks to its booming popularity, it has invested a lot in an extensive support section where you can not only access tutorials for various skills or contents but a series of online training courses as well, which organize the tutorials in a workflow-based succession of videos and examples that range from basic Canva for beginners to the main elements of graphic design or social media related content production.
Visit the Canva Design School here.
All this doesn’t even include the huge amount of tips and tricks from third parties that can be found on YouTube, for instance.
One suggestion for those just starting to use Canva is to use the folders feature to keep your work better organized and your creations easier to find. Otherwise, you risk sometimes having to start a design from scratch that you had already created before just because you cannot find it anymore. As Canva saves your work constantly, it’s easy at the beginning not to pay attention to the power of giving files names and placing them in specific folders.
How to use it in practice?
The main elements that make Canva a success and that you should consider when approaching it are the following:
Non-destructive editing means that when you edit some content, you can always revert to the original version. This is crucial for encouraging users to try different options and solutions without the fear of losing some precious images or files.
The layered content approach allows us to edit only parts of a design as if working with different files stacked on top of the other, normally with a transparent background. It means that if you put text, photos, graphic elements, icons, or anything visual on your file, it will stay on top of the previous element, and both will be separated and independent from each other, allowing for further modifications of one that doesn’t affect the other. Of course, the layers can also be arranged differently, bringing one to the front or to the back of this imaginary stack.
The possibility of automatically aligning objects from different layers by simply dragging them on the screen is also a great help when creating anything graphic.
The huge (seemingly endless) repository of models, images, shapes, graphic elements, icons, text fonts, and other content, such as videos, audio files, and even AI-generated images, can be easily searched for and used in a project.
If these basic concepts are fully grasped, it’s easy to produce almost anything a youth leader or worker may need in terms of communication, visual content, decorations, presentations, and so on. Do you need to prepare a leaflet? Easy… An invitation? Even easier!
The following are the main steps needed for creating a graphic project in Canva:
Understand which size your project should best fit. In doubt, just follow the proposed examples (for instance you can use a template for an Instagram Story or for a Facebook event). You can easily specify what you need when prompting Canva for a new project.
Browse the already existing models. They are all editable in every small detail, so if you like the look and feel of one model, you can simply pick that one and start editing directly on top of it instead of having to start from a blank page. Feel free to use the blank template if you’re feeling extra creative!
Edit your project using the available content (photos, graphics, text, color palettes, and so on) or upload your files (your own pictures or existing logos, fonts, videos and audio files, even your own presentations).
Each design can include a very large number of separate pages, so you can try variations or create a long presentation.
When you are happy with the results, it’s sharing time. You can download all the pages, a single specific page, or you can share them with specific links that allow you to show your files or invite people to comment on them or edit them. Or you can associate your main social media accounts and publish directly from Canva to Instagram, for instance. It’s actually also possible to print on different materials (from mugs to t-shirts, from paper to stickers) and have everything delivered directly to your door.
What are good practice examples?
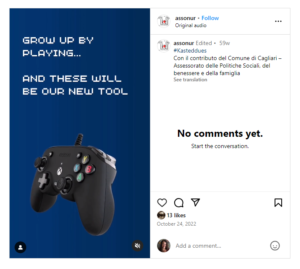 After exploring the main features of Canva, we were able to use it to produce video advertisements for our projects and, lately, even animated logos to use as intro and outro clips in bigger video projects. But in the last two years, we have used Canva for almost anything from coordinated project images to game design. But probably the most interesting use of Canva and its sharing content features is creating interactive presentations of our projects that people can access through a link instead of being attached to an email as a file to be printed. It’s almost like creating micro websites using only your imagination (hyperlinks work inside and outside of a Canva file) without having to write any code.
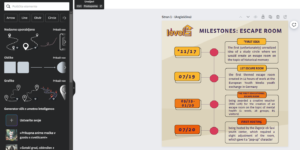
One project we are currently working on is an escape room game built entirely in Canva.
Here are a few visual examples of Canva projects:
What are its features that support inclusion?
Canva is like graphic design for the masses (which is why it’s looked at with great suspicion, to say the least, by professional designers). It’s free to access, with an extensive library of content (like stock images, for instance), which is easily accessible to anyone regardless of their personal finances. Since it’s also available through smartphones it’s virtually accessible by almost anyone that has a phone and an internet connection. Unfortunately, we are not aware of how accessible Canva really is for people with physical disabilities. But Canva provides more details and a full report about this topic here.
It’s possible to download a fully VPAT® compliant walk-through description that highlights what features Canva supports and which it doesn’t. Canva also offers Audio-only and Video-only content support, Captions, and Audio Descriptions or Media Alternatives to images. Of course, as mentioned, Canva is strongly based on visual content, which can limit its accessibility and inclusiveness.
What are alternatives?
Canva is almost a market killer given its features, ease of use, and a competitive free plan approach. But sometimes, using it also feels overwhelming because of the richness of content that can be difficult to choose from. If you are a person who finds it difficult to make up your mind, you may easily get lost at step one of the workflow: choosing a template to start with. Some great alternatives are Adobe Express (previously known as Adobe Spark), which is also available as a smartphone version; Snappa, which has a more straightforward interface than Canva and a library of millions of free stock photos to use; and the Pixlr suite offering several excellent tools from photo editing to quick template-based graphic design. All of the above offer a free account with the most available features.