How to set it up?
Our first step will be to create a free account on the home page. Once you log in, you will first be asked to allow the app to use your camera and microphone. This will immediately create a preview of your video on the left side of the screen. Then, a series of pop-up suggestions will guide you through the setup step by step.
Because Melon aims to simulate a broadcasting studio, the main setup concerns the visual look and feel of your specific event/brand. You will be guided through creating a design by accessing different options from the menu bar on the right side of the screen. We suggest familiarizing yourself with the bar, as during a live stream, a quick switch between one tool and another can make the difference between a poorly delivered livestream and a professional-looking one.
The main personalizations available are grouped under a few icons.
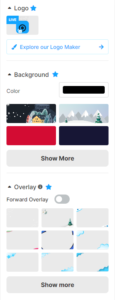 The Design icon opens a menu where you can choose a logo, a main color, a background image, and an overlay that can be shown during your livestream. You can easily drag and resize some of the main elements, such as, for instance, the logo you have chosen.
The Styles icon allows for choosing different color combinations and many ready-to-use layout templates. Under the Text icon are some crucial tools such as banners, an animated ticker, and a teleprompter (perhaps the most useful tool), where you can prepare long texts guiding you through your show as your text rolls downwards on your screen as you speak, seen only by you (and easily controlled through three big and bright on-screen buttons).
Finally, the video icon allows for uploading intro and outro videos that, if enabled, will start to play automatically before the live stream or the recording session and after you hit the “stop” button at the end.
There is also a possibility of a virtual green screen, but the feature demands so much CPU that it’s hardly of any use. Consider buying a physical green screen if you get into serious video work.
There are many more settings, but a reasonably good-looking result may simply rely on these very basic ones we just listed.
One great feature is the possibility of preparing several different settings for each of the variables above to have a brand kit ready for different projects, which is easily accessible through a drop-down menu at the top right of the screen.
If you engage in a live video session, a crucial feature is the possibility to choose between several different video channels in the profile settings, such as YouTube, Facebook, Twitter, Twitch, and more. You can even stream through Melon to several other platforms for your Zoom meetings.
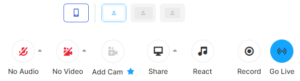
On Melon, your screen is divided into three main areas. On the left, you can see the different video inputs you can add or remove from the scene while your stage is in the middle of your screen. Basically, it shows you what the streaming will look like. There is also a menu bar on the right, which we already mentioned above. Last but not least, the lower part of the central area, under the stage, has two rows of controls for your video. The smaller ones right under the stage allow you to change the layout of all the inputs you have activated to be shown on stage. The bigger buttons below are for controlling the microphone, cameras (it has a multicam capability, meaning you can use more than one camera at a time and change the point of view as you please), screen sharing, and record or go live buttons.
Here is a helpful link on how to set up and use Melon in very few steps. You can also check the video below.
How to use it in practice?
The main purpose of Melon is to make very professional-looking streams or videos with multiple participants or even just one sharing other content (imagine the possibility of recording educational content). So it is a great tool to disseminate your activities results, run online live sessions, prepare and share promotional or educational content, and make interviews or reviews of anything like movies, web pages, or articles.
 A typical session will see you starting the specific video setup (such as the graphic look and feel or the branding and style), checking camera and mic settings, and then sharing a link with your guests that will connect them through their browser or phone. But once everything has been tested and checked, you can push the green button and go live! Alternatively, as long as you don’t put a video/audio input on stage and don’t start the actual recording or live session, it will not be very different from a Zoom or Google Meet call.
A basic rule of thumb to avoid live sessions epic fails is to practice the different tools and settings while in the studio, try some local recording sessions, and only go live after you’ve had a bit of experience with it alone.
A great solution is actually when you can rely on teamwork and have a person manage Melon as a behind-the-scenes director, and another team member mainly deals with running the show on stage. Keep in mind that this app was made with the needs of a very small organization or even an individual creator in mind, so after a little bit of practice, you will be able to make the most of it, even if you’re working alone.
What are good practice examples?
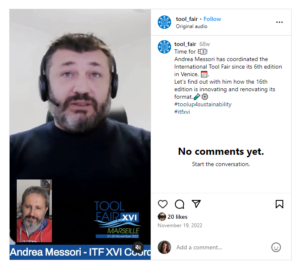
We started creating short interviews for Instagram reels or even stories through Melon, as it has a feature that allows a vertical screen layout setting, and it has proven to be a great tool for introducing new users to the concept of streaming actively (instead of being a passive watcher).
One example can be seen here. This is one of a short series of interviews that promote an international event. All the layout and changes have been managed through Melon, while the graphic animation of the videos has been created with Canva.
The use of Melon has proven to be of valuable support in both synchronous and asynchronous online activities where audiences can access the content as it happens live and thus interact through chat or even by being invited on stage, or they can watch it on their own time when it comes to educational content. Of course, live events can always be a bit risky, and this must always be considered.
We are now in the process of using Melon to teach youngsters how to manage the complex settings of a studio to produce a simple Twitch channel about their gaming experiences. For instance, in our project of inclusion through eSports, we have started a streaming activity on Twitch, and the streaming is managed through a Melon studio. In our first experiment, we already managed to involve the young participants directly, handing them the director role and letting them choose what to stream. A downloaded version of the stream can be seen here.
What are its features that support inclusion?
Because of the low cost, smooth learning curve, and the opportunity to produce content that can easily be edited even BEFORE it is shared online, Melon allows for a far greater level of confidence in users who do not feel comfortable with exposing themselves on video. It also allows users to learn how to deal with video formats, acting behind the scenes as directors instead of having to jump on stage.
Also, as with many other online meeting tools, it lowers the financial barriers to accessing experiential learning based on international and intercultural meetings.
On the other hand, it doesn’t have specific features to improve accessibility for people with visual impairment or physical disabilities. It does offer the chance to use many of the important features through keyboard shortcuts, making it easier for users who cannot use a mouse for too long.
What are alternatives?
There are several alternatives on the market. We can mention Streamyard among the most similar ones, which does the same at a higher cost. Then there are even open source alternatives (for instance, OBS Studio), but with a much steeper learning curve and heavy toll on your computer’s CPU usage, meaning that many times they are not the most viable solutions for organizations or individuals relying on cheaper hardware.