7.8.9 Guideline: Meeting with the affected student

  • Introductory phase
    Build a relationship
    Build trust
  • Share your observations
    I have noticed that…
    I don´t see you anymore…
    Your parents are worried…
  • Ask the student to express his/her thoughts and feelings
    Do you like coming to school?
    Do you feel good in your class?
    How are you?
  • Inquire whether the student wants to change the situation
    This is a difficult situation
    Do you want things to change/to improve?
    I am sure that we can do something  to modify what is happening. Would you like that?
  • Convey confidence
    A lot of students have gone through similar experiences as you and found a way out.
  • Show interest and commitment
    What is happening to you cannot be tolerated.
    I want every student to be able to attend school without fear –  that includes you.
  • Procedure will be explained
    I will have a meeting with some of your classmates.
    Together with them, I will think about ways to improve the situation for you and the whole class.
    The group will consist of students you like but also include those who are causing your problems.
  • Take away the burden of the student
    You don´t have to become active. I will take care of it.
  • Convey safety
    It is important for you to know that nobody will be punished or will get in trouble.
  • Who should belong to the support group?
  • Bullying protagonists
    In order to be able to do something for you, I need to know who is participating in giving you a hard time.
    Who is bullying you? Anybody else?
  • “Neutral” students
    Friends
    Who do you get along with?
  • Confidentiality
    Student expresses what should not be mentioned.
  • Agree on a date for a follow- up meeting
Source:

  • Fairaend, Heike Blum, Detlef Beck, Trainingmaterial 2009, Gespräch mit gemobbten Schüler

7.8.10 Evaluation: Meeting with the affected student

Depending on the size of the group the role play can be evaluated by a facilitator and a group member (observer). Here are lead questions for the evaluation.Step 1: The “affected student” will be asked

Step 1: The “affected student” will be asked

  • How are you doing now?
  • Which phrases/behavior/attitude were helpful for you?
  • Were you able to build trust?
  • Anything that was not constructive?
  • What else could have been helpful/positive?

Step 2: Questions to the “teacher”

  • How are you doing now?
  • What did you manage well?
  • What was difficult?

Step 3: Feedback of the facilitator (observer) (directed at the teacher)

  • I liked…
  • Some ideas on what the teacher could consider/change in the future
Source:

  • Fairaend, Heike Blum, Detlef Beck, Trainingmaterial , Evaluation Gespräch mit Mobbing Betroffenem, revised by Beate Roggenbuck

7.8.11 Role play teacher/student meeting

Duration: 

50 min

Aim:

Participants will conduct the first role plays in different roles. There will be two rounds offering the chance to either “play” the teacher or the affected student and thus experience how the guideline for the talk is working.

Materials:

Flipchart No. 13, guideline for the meeting with the affected student (prepared copies), evaluation guideline:  meeting with the affected student (prepared copies), two role play settings (enough copies for the subgroups),
flipchart No. 14.

Instruction for implementation:

The facilitators ask the group to split up in subgroups of three. They distribute the copies of the guideline for the meeting (Flipchart No. 13). The participants distribute the roles amongst themselves (1 teacher, 1 student, 1 observer) Teacher and student face each other, the observer keeps a little distance. Teacher and student receive role descriptions. If possible the subgroups find a quiet corner to practice the role play. Two role plays with alternating roles will be conducted. The facilitators will visit all subgroups in order to get an impression of how it is working.

Flipchart No. 14

After each round, there will be an evaluation which will be moderated by the observer (if applicable by one facilitator). The facilitators will remind the observers to focus on constructive feedback: “What went well?  What did you like?  Which phrases/expressions were positive?” “What could be improved?”  (Find more detailed instructions in the handout: evaluation guideline).After the evaluation in small groups, the facilitators ask the subgroups to return and the whole group reflects the following question:“What can be helpful in this introductory meeting?”

7.8.12 No Blame Approach Training: Support group: conditions

Duration: 

5 min

Aim: 

Participants will get to know the set-up of the support group.

Materials:

Flipchart No. 15

Instruction for implementation:

The facilitators introduce the size and conditions (Flipchart No. 15) of the support group. The group consists of 6 – 8 students, who receive a written or personal invitation which should not include the name of the affected student. The meeting takes place outside the classroom in a separate room during regular classes to avoid resistance.


7.8.13 Meeting with the support group

Duration: 

30 – 40 min

Aim: 

Participants become acquainted with the procedure of the meeting with the support group.

Materials:

Flipcharts No. 16, 17, 18.

Instruction for implementation:

The facilitators explain the procedure (Flipchart No. 16) of the second step of the NBA:

The teacher greets each student personally and tries to create a positive atmosphere by asking some general questions (but not too long), then leads to the topic of the meeting, stressing that they are here because he/she needs their help. Then the teacher points out how the affected student is doing (no use of the word bullying, no blame) stating that a member of the class is having a very hard time. The teacher has to be prepared that this is the first difficult moment since the bullying protagonists might start to defend themselves or even accuse the affected student that it is his/her own fault. It is best, to stay calm and continue the discussion in a future – oriented manner (the NBA aims at changing behavior patterns in a positive way instead of looking back and analyzing misbehavior in the past).

Flipchart No. 17

After the description of the problem the teacher focusses on his/her personal concern then turns to the students as “experts” who can help. It is helpful to think beforehand of a personal skill of each student. What is mentioned should not be superficial or too general but something “authentic”.

Flipchart No. 18

The teacher asks each member of the support group to come up with ideas what he/she can personally do to improve the situation of X. Here ideas like: “I´ll walk home with her/him.” or “I will invite him/her to spend time with me,” might be mentioned and will be appreciated by the teacher.It is sufficient if the protagonist declares that he/she will stop bothering the affected student. In case of cyber bullying, it is mandatory to delete the insulting message/film/website.

7.8.14 Guideline: Meeting with the support group

  • Introduction
    By addressing students personally and by name
    Establish rapport
  • Transition to the subject of the meeting
    You are probably wondering why…
    … because I need your help
  • Describe the problem
    X is having a hard time…
    X didn´t come to school last week…
    … anything that is relevant
  • Express your personal concern/personal interest
  • Use I statements:
    I am worried about X.
    I am alarmed that…
    I find it important that…
    I want things to change…
  • Approach students as “experts” who can help
    I am convinced that you can help me.
    Address each student individually by naming a personal skill he/ she has… ( Here it is important to refer to real skills the students have – nothing general or superficial)
    You know your class and your classmates.
  • How to deal with accusations and criticism
    Don´t respond to them in depth
    We are not here to analyze who did what during the last weeks but to reflect on how to improve the situation for X.
    Our view is future- oriented.
  • Develop ideas
    Ask the students to contribute ideas and visualize them on a flipchart (including the names who is responsible for what)
    All students have to participate (participating can also mean that the bullying protagonists declare that they will stop bothering X.)
  • Teacher expresses praise and confidence
    Teacher thanks the students for their input and commitment
    You will make it!
    Agree on a date for the follow- up meeting in 8 – 14 days
Source:

  • Fairaend, Heike Blum, Detlef Beck, Trainingmaterial, Gespräch mit Unterstützungsgruppe – Gesprächsleitfaden

7.8.15 Evaluation of the meeting with the support group

Depending on the size of the group the role play can be evaluated by a facilitator and a group member (observer).

Step 1: Questions to the “bullying protagonist and colluders”

  • How are you doing now?
  • How will you behave from now on? What will you do?
  • What about the bullying activities: will you stop them?
  • Will you try to put the ideas concerning the bullied student into practice?

Questions to the “neutral students, friends”

  • How are you doing now?
  • What do you think, will the situation improve for X?
  • How do you judge the situation?
  • Will you put your proposals into practice?

Questions to the “teacher”

  • How are you doing now?
  • What do you think the students will do?
  • How do you judge the situation? Are things going to change for the better?

Step 2: Feedback from the “students”

  • What did you like about the facilitation?
  • What went well?
  • What else could have been helpful? Any other ideas how the facilitator could have raised your motivation to support X?

Feedback from the “teacher”

  • What did you manage well?
  • What was difficult for you?  Things you would change the next time?

Feedback from the facilitator

  • What went well? What was constructive?
  • What could be intensified?
  • What should be considered in the future?
Source:

  • Fairaend, Heike Blum, Detlef Beck, Trainingmaterial , Evaluation Gespräch mit Unterstützungsgruppe, revised by Beate Roggenbuck

7.8.16 Role play: Meeting with the support group

Duration:

20 min. distribution of roles, preparation,
30 min. role play,
60 min. evaluation and group discussion

Aim:

Participants will slip into the roles of either teachers or students (bullying protagonists, followers, class representative, and neutral students). The “teacher(s) will train to conduct the talk in a non-accusatory attitude, pointing out that he/she needs the help of the group in order to solve a problem. Thus, the focus is shifted from the affected student to the teacher who asks for support to solve the difficult situation of the affected student X. Participants will experience how the approach is working and which kind of effect it has on group dynamics.

Materials:

role play descriptions, guideline: meeting with the support group, name tags, flipchart No. 19, markers

for the evaluation: Worksheet: Evaluation of the meeting with the support groupFlipchart No. 19

Instruction for implementation:

The facilitators moderate the distribution of the different roles. Sometimes it is easier to choose two teacher representatives. Afterward, the students´ roles will be spread. The facilitators distribute role play descriptions. The “teachers” pick names for the participating students. Make sure to use name tags.

Then there will be time for the teachers to prepare the meeting including the seating arrangement (preferably chairs in a circle).  If there is a team of teachers they will discuss the concrete collaboration (Who will start?  Who is responsible for which phase of the meeting?)  Teachers are encouraged to reflect the different steps but also rely on their own competencies and experiences. Also, they should try to come up with a skill/positive attribute of each invited student. Sometimes it is easier to write down key words. As soon as the teachers have finished the preparation of the role play they will invite the students to come in.  During the role play teachers can signal a time-out phase if they feel stuck, this applies also to the facilitator who observes the role play. Duration: 25 – 30 minutes.

Teachers try to create a positive atmosphere and should avoid traps e.g. long discussions about character traits of the affected student, power games, and provocations.

Evaluation procedure: At the end of the role play the facilitator/observers will moderate a structured evaluation (see worksheet).

After the evaluation, the facilitators ask the participants to shake off their roles and take off name tags. If two groups have worked parallel, they will meet again. Then the facilitators initiate a discussion with the following topic:

“What is helpful during the meeting with the support group? (E.g. behavior, phrases, body language)Helpful phrases/behavior patterns etc. will be noted on a flipchart.
Helpful phrases/behavior patterns etc. will be noted on a flipchart.

7.8.17 Follow up meeting with affected student, support group

Duration:

See time suggestions on flipcharts

Aim:

The participants will be informed about the last step of the NBA: the follow-up meetings with all involved students which will be conducted separately and which will lay the foundation for the decision whether further steps are needed (e.g. another meeting with the support group) or whether the intervention was successful. Additionally, the participants will reflect possible obstacles and difficulties students might encounter.

Materials:

Flipcharts No. 20, 21

Instruction for implementation:

Flipchart No. 20

The facilitators refer to the follow-up meetings which take place after 8 – 14 days (sometimes depending on the age of the students). First of all, it is important to find out how the affected student feels by now. Has the situation changed for the better? Thus the teacher will be able to judge whether further steps are necessary to improve the situation. He/she will also talk to the members of the support group individually, inquiring what the person thinks how the affected classmate is doing now and also ask for an estimate of the current situation.

Flipchart No. 21

Only after all the meetings will the teacher reflect on how to proceed. In case the intervention has not been successful he/she will invite the support group again. Could their ideas be put into practice?  If not, why not?  Other ideas to include/help/support the affected student?


7.8.18 Further steps, open questions

Duration: 

30 -60 min., depending on time agreements

Aim:

Depending on the seriousness of the bullying case and the damage which has been caused, further steps might be necessary. Participants will get to know possible follow-up activities. The intention is to raise the participants´ awareness of a potentially fragile situation.

Materials:

Flipchart No. 22

Instruction for implementation:

Flipchart No. 22

The facilitators comment:  Even after a successful intervention it is important to keep an eye on the affected student.
How is he/she doing?
Are things fine?

Also, talk to the members of the support group about how they experience the class atmosphere and the position of the affected student.  More activities might be needed, e.g. additional support for the affected student, social skills training in class, a buddy program  (an older student is the mentor of a younger one) or an additional program for bullying protagonists. Also, a (cyber)bullying awareness raising training for the whole class sensitizes the students to the problem.After the discussion of potential further steps, the facilitators ask whether there are any open questions left concerning the procedure of the NBA and try to answer them. If the time frame is too tight, a follow-up meeting can be proposed, if manageable. But experiences from hundreds of workshops have shown that a one-day-training enables teachers to apply the approach without problems.

Evaluation procedure: At the end of the No Blame Approach workshop participants will be asked for a feedback, orally or in written form. This should be decided by the trainers. Advised aspects of the evaluation:

  • comprehension of the NBA
  • effectivity of the training
  • training methods

At the end of the workshop, the facilitators will thank the group for participating and encourage them to work with the NBA.

Literature

Source:

  1. George Robinson, Barbara Maines, Crying for help, 2000, p.16
  2. George Robinson, Barbara Maines, Bullying – A Complete guide to the Support Group Method, 2008
  3. Heike Blum, Detlef Beck, Praxishandbuch No Blame Approach 2010, p.60
  4. For better reading only the term teacher is used including the other professions
  5. ead. p. 27
  6. ead. p. 70
  7. www.no-blame-approach.de
  8. Flyer “Mediation in schools and the No Blame Approach”


8.1 Introduction: Conflict resolution in schools and peer mediation

Conflicts are part of our daily life in general, but also in schools. Conflicts and difficulties inevitably arise when people are working/living together. Many of these conflicts, especially the non-escalated ones are solved in one way or the other, not always satisfying for all parties but still acceptable. But schools also face a verbally or physically aggressive or violent behavior pattern of students as a way of dealing with conflicts and quarrels, complemented by cyber attacks in social media. These behavior patterns do not only harm the victims of violence but can also negatively influence the atmosphere in a class and create a climate of mutual mistrust. Furthermore, some teachers observe a change in the “quality” of violent behavior. Keeping in mind that students have always fought (verbally and physically) to ensure their status, enforce their interests etc., nowadays an intensified usage of violence can be ascertained. 1) On the other hand, the sensitivity concerning the issue of violent behavior has increased.2)
In a situation like this schools are looking for support in order to deal with these challenges. What are the alternatives?  How can a school enhance constructive conflict resolution skills? This project advocates a holistic approach of applying different measures in the fields of prevention (awareness raising workshops concerning social media), intervention (mediation club and the non-punitive bullying intervention tool No Blame Approach) and curative means like further counseling, therapy etc. depending on the severity of the case.

The aim of conflict resolution programs and peer mediation is not the abolishment of conflicts but a fostering of constructive techniques to deal with conflicts. Students will be supported to learn nonviolent ways to settle a dispute without harming the opponent. Traditionally, students (and adults) think in categories of win and lose, so it is either him/her or me. This is a conflict solution pattern which is prevalent in different areas of society. Constructive conflict resolution on the other side supports a solution beyond win-lose a win-win situation. It is an attitude which does not neglect different opinions but tries to find solutions which are satisfying for both sides. 3)

Peer mediation is one of the key concepts of conflict resolution between students. It is based on the idea that the support and presence of a third, neutral party is helpful to solve a conflict. Direct confrontation and the escalation of the dispute will be avoided and instead the third party (often a team of two trained peer mediators) will create a situation where the involved students are encouraged to find a nonviolent solution they both agree on.

8.2 Background of peer mediation in schools

The principle to include a third, impartial negotiator in difficult conflict situations is nothing new and has been practiced in different contexts and times in private affairs, in groups and organizations or in politics.  It is also a universal idea, not limited to European societies. What is relatively new is the principle that it is not the arbitrator but rather the conflicting parties who find their own answer. Normally an arbitrator listens carefully and then offers a compromise. Mediation believes that conflicting parties can come up with fair solutions for their problem (they are the experts) after participating in a mediation process. And this is also true for adolescents. Students can be trained to be able to facilitate a mediation process and encourage quarreling students to think about possible and adequate solutions.

Where did peer mediation start? The first training programs for constructive conflict resolution for children and youngsters were conducted by the Religious Society of Friends (Quakers) in schools in New York City in the beginning 1970-ies.  In the 1980-ies these trainings were further developed into mediation programs.  Since then the concept was widely spread in the USA and reached predominantly West European countries in the 1990-ies.

8.3 The concept of peer mediation

Peer mediation is based on the assumption and experience that (older) students can assist (younger) students to solve their problem in a facilitated process, the mediation. 8th or 9th graders participate in a training which enables them to conduct mediation on their own. The training comprises approximately 30 hours in which the students deal with the following topics:

  • Definition of conflicts, conflict escalation model, conflict behavior patterns, personal conflict style;
  • The five phases of mediation, the mindset of a mediator.

The procedure is trained in intensive role plays with a subsequent evaluation, key skills e.g. active listening are practiced in different exercises.

Five phases of the mediation process 4)

  1. Opening statement (welcoming of parties, procedure, agreement on ground rules)
  2. Viewpoints and issues: How does each party view the conflict? (parties express their point of view)
  3. Understanding the conflict (what are the deeper issues? Feelings, needs and interests of parties, encouragement to change perspectives)
  4. Looking for possible solutions: Who can offer what?  (Parties develop possible solutions)
  5. Agreement and closing (Parties agree on a solution, written or verbal contract, mediator wishes them well)

Usually, two students form a mediation team. Although a lot of adult mediators work on their own this is not advised in case of students conducting mediation.

A key point of the training will be the attitude or mind set of a mediator. In many cases adults and students tend to judge situations quickly: right or wrong, just or unjust, victim or offender.  Being a mediator means to take a neutral position, not to judge and not to be one-sided. In case one of the peer mediators is a friend of a participating party another student should replace him/her.

8.4 Why mediation clubs in schools?

Unresolved conflicts, verbal or physical aggression can significantly worsen the atmosphere in a class. Often, a quarrel during a break which has not been solved distracts the attention of the affected students in class. Another “classic” situation: the teacher observes a fight between two students intervenes but does not have the time to pacify it because the school bell rings.  All of these cases can lead to frustration and anger or a continuation of the quarrel during the next break and after school. Teachers often feel frustrated because of the missing time to thoroughly deal with the problem. 5)

In order to establish and support a constructive conflict resolution approach in schools it is advantageous to get students actively involved and experience the enhancement of their skills.  So, there can be a mutual benefit for both teachers and students: students learn how to improve their competencies (conflict resolution, empathy); teachers are relieved in their daily tasks. Solutions which have been developed by the quarreling parties themselves are more likely to be successful than a decision of a teacher.  Students are empowered to take care of their own problems with the help of peers. Louisa, a peer mediator from a school in Bonn states: “We want that everybody feels comfortable at school. Young people are able to mediate, not only adults.”  6) and Špela, a peer mediator in Maribor, adds: “Mediation is a process where we learn how to calmly and effectively solve a disagreement between people. It teaches us how to see the other person’s perspective. We learned different techniques how to help them solve their problem. Role plays which we used to practice the mediation process were based on actual disagreements happening in our lives. The concept of mediation used to be strange for us because it is unusual for our schools and dorms but I think it can be a useful tool to solve conflicts. The introduction of a mediation club can contribute to an improvement of the school climate.”

8.5 What could mediation clubs look like?

Interested students will form a mediation club together with one or two committed teachers. A good size of the group is 10 -16 students consisting of 8th and 9th graders. The aim is to train the practical steps of a mediation process, to learn about conflicts (definition, development, escalation model, conflict styles), the attitude of a mediator and the limits of mediation (mediation is not advised in a case of (cyber) bullying, criminal acts, and mayhem because of an imbalance in power).  The first step is the qualification of the mediation club members (teachers and students will be trained together), often carried out by an external expert. Sometimes the selection of students who will be trained as peer mediators is sensitive, not all volunteers are equally suitable. Here the teachers might decide to give someone a chance because they see a potential for personal growth or decide differently, depending primarily on the circumstances in a particular case.

After the training, the commitment of the students/teachers should be appreciated by issuing a certificate.  Alternatively, teachers can attend a mediation training offered by further or higher education institutions, e.g. in Germany in order to be able to qualify their own students. By participating in the training the concept and didactic methods will be passed on to the teachers who from now on can train the next generation of students themselves. It is important to discuss the practical arrangements (see paragraph guidelines for implementation) before or during the training period to avoid a long break between the training and the first application. Students are usually eager to start right away. The members of the mediation club will meet with the teacher mediators on a regular basis, possibly once a week or every second week for an hour – depending on the conditions in school. During the meetings mediation cases can be reviewed:  what went well, did any difficulties occur, what can be improved? If the students don´t have any or many cases yet they might want to discuss how to change the situation.

8.6 Guidelines for implementation

In order to successfully implement a peer mediation program in schools, it is necessary to discuss a possible introduction of this method with the principal and teaching staff and gain the approval of the majority of the teaching staff. In several cases, some teachers who were interested in applying peer mediation in their schools started this discussion by informing their colleagues and principals about the concept and the philosophy behind it. Peer mediation is a conflict resolution approach which strongly advocates the competencies of youth and their empowerment to solve problems independently. This, on the other hand, also relieves teachers in their daily work. Teachers should be asked to promote the program by encouraging their students to try to solve potential problems in peer mediation. If possible, an introductory workshop for teaching staff should be offered by external multipliers.

In a next step the students and their parents will be informed.  A good way to present the program is a visit to the mediation club in classes in order to explain the concept themselves. So the younger students get to know the peer mediators in person. Some mediation clubs include short role plays in their presentation. Parents can be informed personally during a parents/teacher meeting or in written form.  Point out the chances and opportunities the program has. Parents of a peer mediator are often proud of their child´s commitment.

Practical steps of the implementation include:

  • Finding a room for the meetings of the mediation club and where mediation can be practiced without interruption, if possible, hang up pictures of the mediation club, a poster etc. so that students feel comfortable. Visualizing of the basic rules for behavior during a mediation and attach  them to the wall
  • Agreeing on a timetable to offer mediation: g. Thursdays in the 5th lesson or once a day during a longer break
  • Forming of mediation teams, who wants to form a team with whom? Is it helpful to create mixed teams (female/male)?
  • Should the peer mediators be recognizable by wearing caps or buttons?
  • Finding ways to “reward” the commitment of the peer mediators, e.g. by a positive remark in the school report

The implementation of a peer mediation program takes time and is sometimes accompanied by phases of standstill. 7)  Then it is important to reflect whether the program receives enough support from the teaching staff, the conditions, e.g. time frame for mediation are still adequate or whether there are other conditions which could be improved.

A central aspect of a successful implementation process of peer mediation is the embedding of mediation as one approach to a concept of conflict culture in a school which also implies preventive measures (teaching of social skills, awareness raising units as described in chapter 6), intervening measures, (cyber) bullying intervention: No Blame Approach, chapter 7) and curative means, e.g. personal counselling by a social worker or school psychologist. A well thought through introduction of a conflict culture in schools will lead to a significant improvement of the school climate.

The principle, teachers and (if possible) representatives of parents should discuss the introduction of these measures of nonviolent conflict resolution as part of the school profile.


8.7 Mediation training curriculum

The following planning describes a mediation training of 30 hours organised in 10 units for schools. Depending on the facilitation possibilities and venues, the training can also be held in 4 days (e.g during a project week in school) or at 3 weekends, whatever is possible. In these units, you will have a start and ending session which takes time and you will have less of this if you have whole day – workshops for instance.  Feel free to organise breaks and energizers when it is needed according to the group and the exercise. The timing is calculated for a group of 10 to 16 participants in order to give you an orientation.

8.7.1 Coming together and building a group

Exercise, handout number Time Method Material
Welcome, introduction 10 min Circle Prepared flipchart with welcome
Partner interview, mutual presentation
Optional – if the students don´t know each other well
30 min Name, hobbies, motivation to participate in the project, any experiences with conflict resolution techniques? Student pairs interview each other
Expectations and “rules” 20 min +
10 min
Division into groups of 4, expectations, fears, contribution – 2 cards for each field, presentation; 6 cards in 3 colours per group, candies to find the members of the group
Flipchart
 The three musketeers and conflicts  35 min Exchange their perception of conflicts concerning the facts
afterwards: exchange in whole group
Groups of 3 students
Copies of handout 2
Space
What do you associate when you hear “conflict”?  10 min Closed eyes – perception – exercise of a conflict Facilitators note associations on flipchart
Evaluation 10 min Closed eyes – perception – exercise of a conflict Ball to throw or “talking stone” to pass around

Handout 2: The three musketeers and conflicts

Duration: 

30 min

Aim: 

Participants will view conflicts from different perspectives and will compare their personal attitudes with those of the other group members. The aim is to realize that conflicts are two faceted: they are disliked and might cause fear but on the other hand they offer a potential for development.

Materials:

copies of the form for each subgroup, pens

Instruction for implementation:

The facilitators ask the students to split up in groups of three and discuss the different perceptions of conflict. The next step will be to find common answers and note them on the paper. Afterwards the groups exchange their results in the plenary.

Evaluation procedure: The facilitators will underline the two faceted characters of conflicts.

These are three aspects of conflicts we all dislike:

These are three aspects of conflicts that scare us:

These are three aspects of conflicts we find interesting or even exciting:

8.7.2 Learning about conflict

Exercise, handout number Time Method material
Opening session 10 min Exchange in a circle – what has happened since our last meeting regarding conflicts?
 Conflict definition 10 min Brainstorming of the students and then presentation of the Glasl definition Copies
Guideline conflict styles 40 min Self-assessment: How do you handle conflicts? Understanding of behavior patterns Copies
Types of conflict 15 min Copies
Conflict escalation model 15-30 min Copies
Evaluation 5 min

Handout 3: Conflict definition

 At two who interact

There is a difference in goals, values, interests, needs, perceptions, ideas, resources

Negative emotions arise

At least one person is hindered in what he/she wants to achieve.

Source:

  • Katharina Schilling, Peacebuilding and conflict resolution – Methods and games to facilitate training sessions, 2012, p. 99

Handout 4: Guideline conflict styles

Self-assessment: How do you handle conflicts?


Duration: 

40 minutes

Aim: 

In order to understand behavior patterns of other persons (students) in a conflict situation it is helpful to reflect one´s own conflict behavior. How do the participants handle conflicts?  Is a direct confrontation preferred or other strategies (e.g. avoidance, distraction, finding compromises)?

Materials:

Flipchart and markers

Instruction for implementation:

The facilitators/trainers  inform the participants  that they  will introduce an exercise reflecting different conflict behavior patterns.  There are five different personal types which are symbolized by animal metaphors:

Tiger –  Attack
A tiger stands for an attitude which wants to discuss problems right away. Being strong and self- confident the tiger puts things on the table, attacks rather than withdraws. His attitude can be challenging or even frightening to others.

Dog  –  Defense
A dog symbolizes someone who defends himself and tries to justify his or her own behavior without really listening or trying to understand the other position.

Mouse   –  Escape
A mouse prefers to escape potentially dangerous situations. She will hide in her mousehole until the storm is over. The conflict strategy is to avoid or flee.

Fox    – Distraction
A fox represents an attitude of distraction in a conflict situation. The fox doesn´t comment the problem but rather brings up another issue or tries to involve other persons to change the focus of the given situation.

Owl- Reconciliation
An owl is able to turn her head completely thus seeing everything and valuing all parties in a conflict. She tries to build bridges, to encourage conversation and find compromises. She doesn´t take sides.

The trainers ask the participants to choose an animal which reflects their own patterns, not to a hundred percent but as the main characteristic. Form working groups according to the animal identification.  Ask the participants to brainstorm advantages and disadvantages of the specific conflict type.

The working groups meet for appr.  20 minutes, afterward the facilitators collect the results on a flipchart.

Evaluation procedure: Participants will be encouraged to discuss whether there is an optimal strategy how to deal with conflicts and will discover that each behavior pattern offers chances but has also traps. The position of the owl is representative of an attitude which tries to see both sides of a conflict.

Source:

  • The categories are based on V. Satir, in Claude Helene Mayer, Trainingshandbuch Interkulturelle Mediation und Konfliktlösung, 2006

Handout 5: Types of conflict

Conflicts over information and priorities
Students:

  • Are not sufficiently informed.
  • Have different opinions/ priorities concerning facts or data.
  • Got the wrong information.
  • Different sets of criteria.

Conflicts of interest
Students:

  • Have different interests and needs.
  • Experience assumed or actual competition
  • Try to enlarge their personal power.

Relationship conflicts
Students:

  • Experience strong positive or negative feelings with regard to another student.
  • Don´t communicate appropriately anymore .
  • Don´t listen to each other.
  • Develop false perceptions or prejudices.

Values conflicts
Students:

  • Have different values and norms.
  • Pursue differing goals.
  • Represent differing lifestyles, basic convictions, religious views, ideologies, values…

Structural conflicts
Students:

  • Show destructive patterns in their behavior and interaction.
  • Have different personal or social resources.
  • There is an imbalance of power and authority.
Source:

  • Bensberger Studien 18, Anders streiten lernen, Konflikte schlichten in der Sekundarstufe, 2010, p.11, revised by Beate Roggenbuck

Handout 6: Conflict escalation model

9 stages of conflict escalation – Background information for trainers
The Dynamics of Escalation in Conflicts

Friedrich Glasl defines nine stages of conflict escalation to describe the dynamics of escalation.

A central task within the framework of constructively dealing with conflicts is to compare signs of escalation in conflict with the various stages of de-escalation and find answers and potential for action at all stages, in order to limit violence or prevent it altogether and achieve cooperation and solutions for negotiation. Sensitivity and a realistic perception of what is happening in the conflict are just as important as consciously rethinking and planning one’s own steps.

The Nine Stages of Conflict Escalation according to Friedrich Glasl

  1. Hardening
    Standpoints harden and take on a collision course. Awareness of the impending impact leads to agitation. Despite this, the conviction still remains that tension can be dissipated through discussion. The parties or positions are still flexible.
  1. Debate
    Polarisation of thought, emotion and will take place. Thinking in terms of black and white occurs along with a viewpoint of superiority and inferiority.
  1. Actions, not Words
    The idea that ‘talking no longer helps’ and the strategy of fait accompli gains in importance. Empathy for the ‘other side’ diminishes, and the danger of wrong interpretations grows.
  1. Images/Coalitions
    Rumors spread, stereotypes and clichés are formed. The parties manoeuvre each other into negative positions and fight. A search for supporters takes place.
  1. Loss of face
    Open and direct aggression (unlawful) ensues which aims to cause the opponent to lose face.
  1. Strategies of threats
    Threats and counter threats increase. Escalation of the conflict accelerates due to ultimatums.
  1. Limited attempts to overthrow the opponent
    The opponent is no longer viewed as a person.
    Limited attempts to overthrow the opponent are seen as a ‘fitting’ and carried out. Reversal of values: relatively slight personal damage is seen as a victory.
  1. Dissipation
    The destruction and dissolution of the hostile system are pursued intensively as a goal.
  1. Together into the abyss
    Total confrontation ensues and there is no way back. Extermination of the opponent at the price of self-extermination is seen and accepted.
Source:

Conflict escalation model adapted for students: Until the bitter end
  1. The guy/girl is getting on my nerves – tension
    He/she is staring at me. He/she talks behind my back. I can´t stand him/her.
  1. I should talk with him/her – first verbal attacks
    I will talk to him but not listen anymore. I´m not putting up with anything anymore.
    I think about his/her bad sides and talk to others about them.
  1. I´ll show it to him/her – actions, not words
    I will show him/her what I am able to do. He/she is going to remember that.
    I will teach him/her a lesson
  1. I will look for friends and supporters – enemy images and allies
    I will involve my friends. I will draw others who are impartial on my side.
    I am completely innocent, he/she started.
  1. I will embarrass him/her – loss of face
    I will arrange embarrassing situations. I will put him/her down in front of others.
    I spread rumors about him/her.
  1. If I catch you I will… – threats
    I think about something mean. I threaten him/her.
  1. I will wear him/her down – limited strikes
    I carry out my threats. I just want him/her lying on the ground.
  1. I can´t retreat anymore – destruction
    I don´t listen to others anymore. Too much has happened so I can´t give up.
  1. The bitter end – together into the abyssWe successfully destroyed each other. The costs were high but we made it. I don´t really remember what it was all about in the beginning but – I didn´t give up because at the end it was all his/her fault.
Source:

  • Jamie Walker (Ed.), Mediation in der Schule, 2005, p. 171 Bensberger Studien 18,  Anders streiten lernen, 2010, p.11

8.7.3 Principles of win-win

Exercise, handout number Time Method material
Opening session 10 min Exchange in a circle – what has happened since our last meeting regarding conflicts?
The orange conflict: different options to solve a conflict 15 min Raising questions about options in order to solve the conflict Orange, flipchart, copy
Optional: donkeys 10 min Raising questions about options in order to solve the conflict picture
Role play: 2 strategies to solve a conflict 20 min Groups of 3, 2 rounds role play, plenary Scenario of a simple conflict. Instruction: role play 1: students quarrel, teacher decides
Role play 2: students quarrel, will be sent to a mediator
Principles of a peer mediation 20 min Plenary Copy
Attributes of the mediator 15 min Group discussion – what is needed for good listening? Brainstorming Copy
Skills of a student mediator 15 min exercise Copy
Good and bad listening – mini role play 15 min exercise Facilitators/teachers will demonstrate good/bad listening in a mini role play
Evaluation 10 min

Handout 7: The orange conflict

Duration: 

10 minutes

Aim: 

This exercise aims at pointing out the advantages of a process which tries to understand the motivation of parties in a conflict. Normally we are thinking in categories of win-lose, either-or or come up with a typical compromise. But sometimes there is a solution beyond these possibilities: a win-win solution.

Materials:

Flipchart No. 1, (flipchart samples see additional material)

Instruction for implementation:

The facilitators describe a conflict between siblings:

“Two sisters are having a conflict over an orange. Unfortunately, there is only one orange left and the shops are closed.  Their mother hears their shouting, opens the door and asks her daughters what is going on. Both girls insist on wanting the whole fruit.”

What can be done? The facilitators invite the participants to brainstorm different solutions and note them on a flipchart. Possibly options 1 – 4 will be mentioned, the facilitators add option 5 in order to exemplify a win – win solution.

Option 1: The mother cuts the orange in half (typical compromise).

Option 2: The mother gives the orange to girl A (win – lose).

Option 3: The mother gives the orange to girl B (win-lose).

Option 4: Neither girl gets the fruit. (lose-lose).

Option 5: The mother asks why her daughters want the orange and finds out that girl A wants to eat the fruit, girl B wants to bake a cake and needs the skin.  (win-win)

Alternative:  use the example of a pumpkin (flesh inside to make a soup, skin to carve a Halloween face).

Evaluation procedure: The facilitators ask the participants why option 5 is different than the other possibilities. What has the mother done instead of coming up with a spontaneous reaction? They point out the advantage of looking behind a position in order to identify the needs of the parties.


Handout 7B: The orange conflict

7 HO WSmediation_B_donkeys

Handout 8: Principles of the mediation process

There are four decisive principles of the mediation process:

  1. Voluntariness
    The parties participate on a voluntary basis. A forced participation can hinder the process of opening up. Students and mediators have the right to stop the process.
  2. Confidentiality
    What is said during the mediation is treated confidentially by all partners involved (students and mediators).  However, the mediators can ask the students whether they can discuss the case on the basis of anonymity with mentoring teachers.
  3. Individual responsibility
    The parties discuss and develop their own solution. Mediators’ don´t dictate a solution.
  4. Impartiality
    Mediators are impartial. They don´t take sides and assure that both parties have an equal opportunity to express himself/herself. If a mediator cannot guarantee his/her neutrality anymore (e.g. because he/she is a friend of a party), he/she should ask a colleague to take over.
Role of mediators

As mediators, you offer your help and assistance to other students to moderate a talk between two conflicting parties.

The mediators are responsible for the process of the meeting but not for the outcome.

The mediators underline that it is the task of the parties to find a solution and that they are the “experts” of their problem.

Mediators are not judges and don´t take sides. They are impartial through the whole process.

Principles of nonviolent conflict resolution

Conflicts are normal

Conflicts arise wherever people come together. We cannot avoid conflicts – but we can treat our conflict partners with respect and solve our conflicts without violence.

Different truths

People experience the same conflict very differently – everyone has their own version of the truth. It is important to accept the other person’s truth.

Solving conflicts cooperatively

No one is to blame for the conflict. We have a common problem and we will look for a common solution. In order to find the solution, we need to take a step back from the positions of the individuals to discover the underlying feelings, needs, and interests.

Solving conflicts creatively

The best solution is not always a compromise. Sometimes it is possible to resolve a conflict in such a way that both or all conflict parties are satisfied.

Handout 9: Attributes of a peer mediation in schools

  • The mediation is conducted by peers
  • Mediators are impartial
  • Voluntariness
  • Conflict parties are present
  • Parties agree to communication rules
  • Mutual empathy is encouraged
  • Respectful dialogue
  • Watch the inner dialogue: how did each party contribute to the escalation of the conflict?
  • Mediators don´t blame the parties
  • No one-sided solutions
  • A written contract
Source:

  • Bensberger Studien 18, Anders streiten lernen, 2010, p. 25, revised by Beate Roggenbuck

Handout 10: Skills of a mediator

Duration: 

15 minutes

Aim: 

By answering the questionnaire the participants think about skills a mediator should have in order to build up trust and reliability. It is a low threshold activity, easy to conduct.

Materials:

copies

Instruction for implementation:

Copies of the questionnaire are passed around, the trainers ask the participants to mark the skills a peer mediator should have with a cross, then turn to his/her neighbor and compare the results. After the exchange in pairs, the facilitators start a wrap up in the plenary, asking for controversial assessments and discussing them. It is helpful to also have a look at the handout “principles of a mediation process”.

Questionnaire:  Peer mediators should…

  • be able to contain themselves
  • get good grades
  • talk a lot
  • have empathy with other students
  • come up with a lot of proposals for a solution
  • be popular with the teachers
  • not blame the parties
  • be able to handle the situation confidentially
  • take the participating students seriously
  • interrupt verbal aggressions
  • keep eye contact with both parties
  • ask for the feelings during the conflict and in the present situation
  • inform the teacher in case of criminal behavior
  • find out who started the conflict
  • be able to listen carefully
  • be neutral

Evaluation procedure:

The participants will be asked to judge how familiar they feel with the mindset of a mediator: e.g. impartiality, non-judgmental, equal treatment of both parties. The activity is one step to lay down the attitude of a mediator.

Source:

  • Jamie Walker, Mediation in der Schule, p.177, complemented by Beate Roggenbuck

8.7.4 Introduction of mediation phases

Exercise, handout number Time Method Materials
Opening session 20 min Recap and open questions
Active listening exercise 30 min Groups of 3 Copy
Preparation of the mediation (room, setting, time) 10 min Plenary
Introduction of 5 phases 10 min Plenary Copy
Phase 1 introduction 30 min Plenary: short introduction
Working groups: find your own phrases for the introduction
Copy
Evaluation 10 min

HO 11: Active listening

Duration: 

20 minutes

Aim: 

Participants experience actively and passively what it means to be a good listener by slipping into the roles of the talking person, the listening person and the observer.

Materials:

a large room to avoid mutual disturbances, three questions for the participants, flipchart

Instruction for implementation:

The facilitators ask the participants to form groups of three and to sit in the shape of a triangle. There will be three rounds with changing roles A, B and C. Person A will talk about a topic raised by the trainers e.g. “Tell us something about your last vacation.”  Person B will listen actively and person C will observe. Time duration: approximately 3 minutes. A short feedback round will follow and person C will share his/her observations. What was well done, what can be improved?

The participants will switch roles after every round and repeat the process with a new question.

Evaluation procedure: The subgroups get together in the plenary again and share their experiences and findings. One trainer summarizes key findings: What are elements of good, active listening? on the flipchart. Distribute the worksheet Active listening and explain the three levels of summarizing.


Handout 12: The five phases of school mediation

  1. Opening statement
  • Greet the disputants and introduce yourself
  • Explain the role of the mediator: assure the parties that you will maintain confidentiality, remain impartial and support them in their search for solutions to the conflict
  • Explain how you will proceed
  • Agree on ground rules
  • Get their go-ahead for beginning the process
  1. Viewpoints and issues: How does each party view the conflict?
  • Who wants to begin?
  • Ask each party to relate the conflict from their viewpoint
  • Reflect back, summarize and ask questions
  • Make sure the rules are adhered to
  • Emphasize what the parties have in common and where they  differ
  1. Understanding the conflict
  • Motivate the disputants to make “I-statements”
  • Concentrate on the feelings, needs and interests involved
  • Express the mood of the moment
  • Support direct communication between the parties
  1. Looking for possible solutions: Who can offer what?
  • Brainstorm possible solutions and write them down
  • Read the solutions out loud
  • Check the ideas: are they realistic? fair? appropriate? specific enough?
  1. Agreement and closing
  • The parties agree to a common solution
  • Write up the agreement
  • Have the parties sign the agreement and give them copies
  • Arrange for a follow-up session in 1-2 weeks
  • Thank the parties for their cooperation and wish them well
Source:

  • Jamie Walker (Ed.), Mediation in der Schule, Berlin 2005, p. 179

Handout 13: Starting the mediation process/Introduction

The peer mediators welcome the students, ask them to sit down and introduce themselves. Tea/ juice and cookies might be offered.

The peer mediators explain their role and task in this process:

  • Mediators are responsible for facilitating the process
  • Mediators are neutral/don´t take sides and support the conflicting parties to develop their own solutions
  • The students can rely on the confidentiality of the mediators

Mediators give an overview of the course of a mediation process

  • Each party has a chance to explain his or her view of the conflict
  • What is the personal significance of the conflict/ What is the background?
  • Mediators enhance communication and mutual understanding
  • Mediators support the parties to look for a fair solution
  • Both parties sign a written agreement describing the common solution

Rules of discussion during the mediation

  • Students don´t interrupt each other, if necessary the other person can take notes
  • No insults
  • Both parties agree to listen to each other.
  • What is said during the mediation is confidential.

Mediators ask the participants for their go-ahead.

Hints:

  • It is helpful to hang up a poster with the rules.
  • It is also helpful to prepare moderation cards with the different aspects in order not to forget anything.
Source:

  • Training material Jamie Walker, revised by Beate Roggenbuck

8.7.5 Introduction of role plays and application

Exercise, handout number Time Method Materials
Opening session 15 min Recap of feedback rules and repeating of phase 1
 Checklist for observers 5 min Plenary Copy
Checklist of a mediation role play 5 min Plenary Copy
Phase 2: Viewpoints and issues –Role play 1+2 40 min Phase 2: Viewpoints and issues –Role play 1+2 (HO 16) Role play cards
Copy
Quit the role of the play 5 min Plenary: importance of quitting the role, let´s shake the body
Evaluation of the role play 10 min Plenary: sharing of the observers of the different groups
Energizer 10 min
Evaluation 10 min Plenary

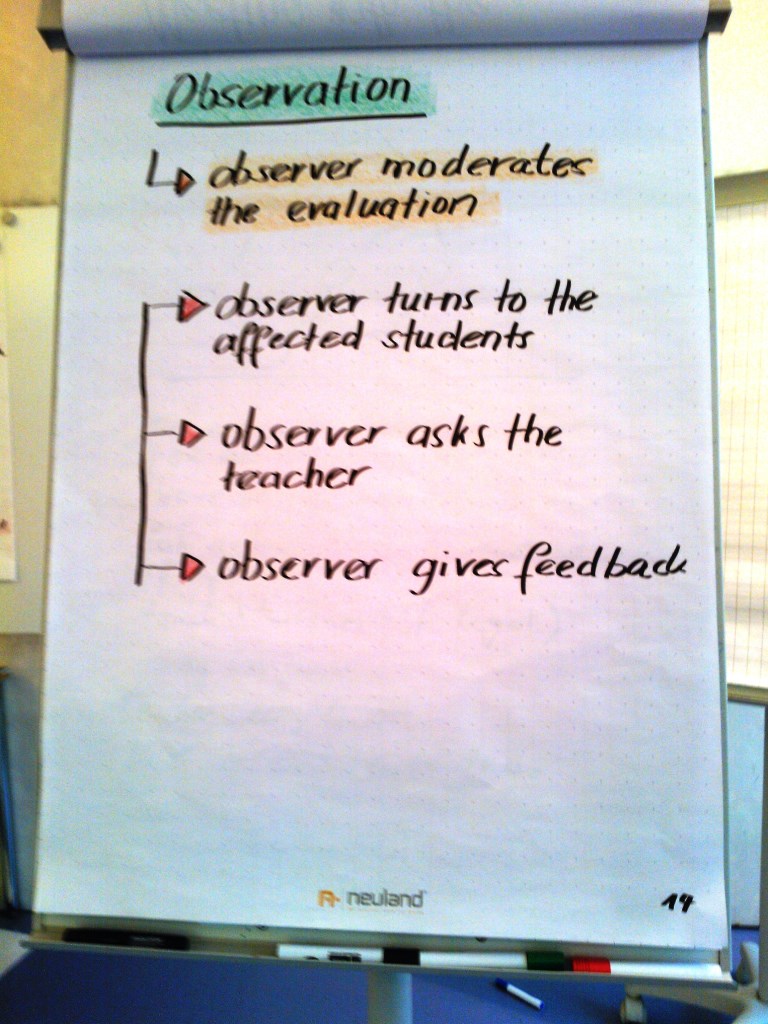
Handout 14: Checklist for observers of role plays

Observers of a mediation role play take notes of the process and contribute constructive feedback during the reflection phase. Observers concentrate on:

Concerning the mediators:

The phases of the mediation

  • Appropriate, helpful moderation of the phases?
  • Was anything left out or neglected/forgotten?
  • Could anything improve the moderation?

Body language and impartiality of the mediators

  • Were the mediators able to express interest in the parties by body language
  • Were both parties equally considered (eye contact, open, friendly body language)?
  • Did both parties get an equal share of contributions?

Helpful remarks/ questions

  • What were helpful, opening phrases or questions?
Concerning the participating parties
  • Did you have the feeling that the parties were able to express their point of view?
  • What kind of behavior did you notice (parties opening up, showing feelings, becoming angry etc.)?
  • Did you observe that the parties were able to take a change of perspectives?
  • Anything else?

Handout 15: Worksheet: Evaluation of a mediation role play

After the mediation role play the trainer moderates the evaluation.

Firstly, the mediators are asked:

  • What went well during the mediation role play? Do you have the feeling that you were able to support the process?
  • Did you feel insecure at any time during the process?
  • What was difficult? What would you like to improve?

Secondly, the parties are asked:

  • How do you feel now? Has the conflict been solved?
  • What were helpful interventions/ phrases?
  • Did you feel understood by the mediators?
  • Anything else, you would like to mention, e.g. ideas how the mediators could have supported you more?

Thirdly, the observers give feedback.
After the evaluation the trainer asks the participants to let go of the role, e.g. by taking of the name tags and actively stepping out of the role.
The group collects difficult situations during the role play on a flipchart and discusses possible alternatives.

Hanouts 16: Viewpoints and issues: How does each party view the conflict?

Who begins?
The mediators ask the parties who wants to begin explaining his/her point of view. Sometimes it makes sense to ask the less active person to begin, in some cases when the parties cannot agree who can talk first to throw a coin.

The parties take turns explaining their viewpoints and issues
The parties have the chance to describe their points of view and are supported by the mediators by using the following skills:

Repeat, summarize and ask (Active listening)
The mediators repeat the crucial points and summarize what has been said. Anything they didn´t understand should be questioned again in order to make sure that they understand the parties point of view. (E.g. Can you please explain … again? or I didn´t fully understand … or From your point of view … happened. Am I right or did I misunderstand?)

Mediators pay attention that the rules are adhered to
Mediators have to insist that the rules of communication are respected, e.g. not to interrupt each other or to call each other names.
“Please wait a second until it is your turn.”
“No name calling during the mediation, we all agreed to accept this rule.”
In a case of a heated situation where the parties have difficulties to calm down, it can be helpful to ask the students to turn around and not look at each other for a while. Another option is to work with a yellow and a red card (similar to the rules of a soccer game).

Emphasize what the parties have in common and where they differ
Summarize their interests and feelings in order to clarify similarities and differences.
“I understood that both of you…”
“You have a different point of view/ opinion concerning …”
“Both of you want to…”

Source:

  • Jamie Walker (Ed.), Mediation in der Schule 2005, p. 185, revised by Beate Roggenbuck

8.7.6 Analysing conflicts and communication skills

Exercise, handout number Time Method Materials
Opening session 15 min Plenary
Game with feelings 15 min Exercise Copy
Difficult statements in school 20 min Plenary Copy
Reflect back 15 min Introduction and questions Copy
Introduction of the ice-berg model and application 30 min Application of the role play Copy
I-statements 30 min Copy
Evaluation 10 min

Handout 17: Dealing with feelings

Helpful sentences:

  • If I understood you the right way, you feel… Am I right?
  • Could it be that you feel…?
  • My impression is that you are sad (angry, hurt…), because…
  • You seem to be very upset, am I right?
Source:

  • Jamie Walker, Mediation in der Schule, p. 195

Handout 18A: Exercise: Difficult statements in School Mediation

Imagine situations in a peer mediation in which a student makes the following statements. Each statement stands on its own – there is no connection between situations.
Try out each scene for a moment to get a feeling for the situation. Consider which feelings, desires and wishes could be hidden behind the statement. Then think of possible ways the mediators might react, e.g. ask for concrete information, have the parties reconstruct the situation, reflect back what you have heard, reflect back the feelings, ask the party to express his or her feelings or to reward a reproach into a desire, ask if there has ever been an exception. Often it will be important to use several techniques – what is important is the order in which you use them. Try out different reactions in a mini-role play but please avoid asking “why” as this might put people on the defensive.

1. He started! He kicked me first!
Feelings:
Desires / interests:
Mediators’ reaction:

2. She’s always doing that! It drives me crazy!
Feelings:
Desires / interests:

Mediators’ reaction:

3. I didn’t mean it like that – she shouldn’t take it personally.
Feelings:
Desires / interests:

Mediators’ reaction:

4. That’s absolutely not true! She’s lying!
Feelings:
Desires / interests:

Mediators’ reaction:

Source:

  • Training material Jamie Walker

Handout 18: Reflect back

To reflect back is an essential communication technique during the whole mediation process. The mediators repeat what has been said by the parties in their own words and if necessary ask for clarification. Here are some helpful sentences:

  • Do you think that…?
  • Did I understand you right?
  • You seem to be …
  • Let me see whether I understood what you mean…
  • My perception is that you are…
  • Could it be that…
  • You think perhaps that…
  • I noticed that you were nearly crying when you talked about…
  • On the whole, I think you mean…
Source:

  • Diemut Hauk-Thorn, Streitschlichtung in Schule und Jugendarbeit, 2002, p. 75, revised by Beate Roggenbuck

Handout 19: The Iceberg Model of Conflict Dynamics

icebergs

Duration: 

10 minutes

Aim: 

The participants become acquainted with one of the most popular models reflecting conflict dynamics: the iceberg model. It is an easy and directly applicable tool in order to understand conflict dynamics.

Materials:

Flipchart No. 1, (flipchart samples see additional material)

Instruction for implementation:

One trainer draws the shape of an iceberg on a flipchart, then invites the participants to name signals for a conflict between two parties which can be immediately recognized and include them in the visible part of the iceberg.  But what lies underneath? What can´t be seen at first sight?  Have the participants reflect the hidden aspects of a conflict and write them down.

Evaluation procedure:  The exercise is a good opportunity to sensitize students to have a second look at a given situation and try to understand what is below the water surface.

Handout 20: I – statements

In order to support an open and authentic dialogue, mediators should encourage students to use I – statements. Instead of accusing the other partner of a certain behavior or using a put-down, the students express what the situation meant to them, how they felt etc. Marshall Rosenberg, a famous American psychologist, developed the concept of Nonviolent Communication.
When students express their personal feelings the focus is shifted from an accusation to the feelings or thoughts which arose after a certain behavior.
An example:
“I am hurt/angry/upset… when you call me names/ talk behind my back/ exclude me for no reason…”
A more detailed I statement consists of four steps:
“When you…
I feel/ am…
Because…
And I want…

Situation 1:
Marco´s parents cannot afford to buy new sports clothes for him. Peter is making fun of him because he is still wearing the old fashioned clothes.
Marco:

Situation 2:
Susan got a bad mark in the latest math test. Irene is laughing at her and calls her a dummy.
Susan:

8.7.7 Deepening phase 3

Exercise, handout number Time Method Materials
Opening session 15 min Recap – feelings, iceberg
Phase 3 introduction 5 min Plenary Copy
Open and closed questions 15 min Splitting in pairs of two students Copy
Role play phase 3 (Including evaluation in subgroups) 30 min Continuation in groups Materials
 Position, interests, needs 20 min Copy
Evaluation 10 min

Handout 21: Understanding the conflict

In the third phase, the mediators try to have a look at what is underneath the water surface, e.g. feelings, communication patterns, misunderstandings, different values, perceptions, needs… In other words, what is behind the conflict? The mediators encourage the parties to open up and use I – statements.
One possibility to start the third phase is to ask the following question: “What does this mean for you?” The intention is to learn something about the parties´ personal background and interests.

Mediators concentrate on feelings and interests:

“What did you think when…/how did you feel when…?”
“What is important for you?”
“What is your goal?”

Mediators encourage I – statements

Mediators try to encourage personal statements (starting with I) instead of general accusations.
“Could you tell us what you did in the conflict?”

Mediators support the expression of the momentary mood of the parties

“It might be helpful if you can tell us how you feel right now.”
Mediators foster direct communication between the parties
“Please tell him/her directly.”
“What do you think about that? Please tell him/her directly.”

Mediators support the change of perspective

“Can you understand how he/she felt?”
“Imagine yourself in his/her shoes. Can you understand what happened?”

Sometimes it is helpful to ask the parties to change seats in order to intensify the change of perspectives. But make sure that both return to their original places!
Mediators summarize the progress of the process
“ I am really pleased that…”
“You have made a big step forward…”

Source:

  • Jamie Walker (Ed.), Mediation in der Schule, p. 196, revised by Beate Roggenbuck

Handout 22: Open and closed questions

In a mediation process, it is helpful to use open questions in order to avoid judgments or accusations. The mediator has a neutral attitude which should be reflected in the communication. Closed questions like

  • Did you do it?
  • Do you think that’s o.k.?
  • Do you always do it like that?
  • Do you want to apologize?

should be avoided.

Open questions

Open questions are questions that invite parties to open up and talk about the incident/conflict. It is not just a “Yes” or “No” answer.
Open questions can start with: How? What? When? Where? Who? ….

For example:

  • What happened?
  • Who else was there?
  • When did things get out of hand?
  • How did you feel at the time?
  • Where did it hurt?
  • What upset you the most?
  • What did it mean for you?
  • Do you want to talk more in detail about…?
  • I am really interested in hearing how you felt when…
  • What is the most important issue for you, can you tell me?
  • I didn´t really understand what you said, please explain it again.
Avoid asking “Why?”

Asking “Why?” usually gives the person the feeling that he or she has to defend himself / herself. People sometimes feel attacked and go on the defensive. They close down rather than opening up.

Source:

  • Jamie Walker, revised by Beate Roggenbuck

Handout 23: Guideline: Position/ Interests/Needs

Duration: 

20 minutes

Aim: 

Participants try to understand the needs of a position in a mediation party by applying the model: position/interest/needs.

Materials:

Flipchart No. 1, (flipchart samples see additional material)

Instruction for implementation:

The trainers point out that it is helpful to look behind the verbalized position of the parties. Or in other words: to look underneath the water surface when we remember the model of the iceberg.

The position is the peak of the iceberg, e.g. the point of view, what is expressed:
what we say we want.

The interests are representing the intentions, goals of an actor, often not expressed directly:
what we really want.

The level of needs stands for wishes, feelings:
what we must have.

An example:

Paul, 14 years old, is often excluded by his classmates when they are playing soccer. He takes revenge by bad mouthing the other students.

His position: If they don´t include me they deserve punishment.

His interest: He wants to join the soccer game.

His needs: He wants to be integrated and accepted.

The facilitators invite the participants to come up with examples of a position in a conflict and then try to analyze the interest and needs behind it.

Evaluation procedure: The participants share their examples and reflect that the expression of a position often mirrors unsatisfied needs.


8.7.8 Solution phase 4

Exercise,handout number Time Method Materials
Opening session 15 min Plenary
Square game  25 min Dividing into groups
Wrapping up in the whole group
Envelopes with puzzle cards
Phase 4 Introduction 10 min Plenary Copy
Checklist for a good solution 15 min Plenary Copy
Phase 5 Introduction 10 min Plenary Copy
Role play phase 4 + 5 continuation 20 min Group work
Evaluation phase 4+5 15 min Plenary Copy
Evaluation of the session 10 min Plenary Copy

Handout 24: Square Game

Duration: 

30 – 40 minutes

Aim: 

Participants learn that the first solution is not necessarily the best one and experience the benefit of a collective effort to solve a problem.

Materials:

Cut puzzle pieces  according to the template below, use thick paper. Prepare one set of envelopes per group (= 5 envelopes) containing pieces of a puzzle with the following pattern:

Different pieces in five envelopes: (A-E)

A: I,h,e

B: a,a,a,c

C: a,j

D: d,f,

E: g,b,f,c

The five equal size squares:

Instruction for implementation:

The facilitators ask for one or two participants who volunteer as observers, then form groups with five members each. Each group gets one set of envelopes, which contain different pieces of different shapes to form a square.  These are the instructions for the following activities in the subgroups:

Instructions to the groups:

  • Your individual task is to form a square.
  • Your group task is to form five squares of the same size.
  • Nobody is allowed to talk.
  • Everybody can put pieces in the middle of the table and take pieces away from there.
  • No one is allowed to intervene in the work of someone else (“steal” pieces).

Observer task:

  • Check that everyone follows the rules.
  • Observe and report later how the exercise developed.

Evaluation procedure:  After about 15 minutes the facilitators ask everyone to come back to plenary and discuss:

  • Have you solved the task?
  • What happened in the group? Did you cooperate?
  • How did the members communicate (eye signals, showing openness…)?
  • How did the individuals behave (cooperate, compete, accommodate…)?
Source:

  • Katharina Schilling, Peacebuilding and conflict transformation – Methods and games to facilitate training sessions, 2012, p.90 revised by Beate Roggenbuck

Handout 25: Looking for possible solutions: Who can offer what?

The third phase in the mediation process is aiming at strengthening the mutual understanding of the conflict parties, furthermore to enable a change of perspectives. On this basis, the parties can go a step further. They can think about possible solutions to solve the problem.  The mediators should encourage the parties to find their own solution: “You are the conflict experts, you know best what to do in order to prevent more tensions and find ways to reconcile again.”

One method to find solutions is to ask the parties to brainstorm possible ways out of the conflict. The mediators take notes of the proposed points (if possible on a flipchart to enable the parties to keep an overview).  The next step is to identify proposals both parties agree on, discuss them in detail and apply the checklist for a good solution.

Another possibility is to prepare a paper circle, cut it in half and ask the students to answer the following questions:

  • What can I do to solve the problem?
  • What do I expect from the other party?

The students write down their ideas and place the paper on the table, (the two halves don´t form a circle yet) and discuss the ideas. Again, the checklist of a good solution will be applied.  If both parties agree the mediators ask the students to combine the halves to symbolize the solution.

This method is goal oriented and often suits the expectations of the students: both parties give and take. Plus it is less time consuming which is helpful in a school context.

If a problem is more complex it might be necessary to use moderation cards instead of paper halves, again following the give and take an idea.

In case the students don´t come up with proposals the mediators can offer assistance: “I have had a similar case before. These students agreed to… Do you think that this might be a possibility in order to solve your conflict?”

Handout 26: Checklist for a good solution

As mediators you have to pay attention that the proposed solution is fair. Here are some questions which are helpful in order to assure a good solution:

  • Is the proposed solution fair? E.G. both parties feel responsible for the solution and contribute. No party will be disadvantaged.
  • Is it a real solution for the problem? The conflict will be solved and not just delayed.
  • Is the solution appropriate? The proposal does not cause additional problems ( e.g. too expensive, someone else will suffer, too complex)
  • Is the solution realistic? Are the parties able to execute the solution on their own?
  • Is the solution concrete? Do the parties know what to do by when?
Source:

  • Jamie Walker (Ed.), Mediation in der Schule, p. 199, revised by Beate Roggenbuck

Handout 27: Agreement and closing

Mediators can intensify the relevance of the solution and mutual reliability of the parties by asking them to sign a written agreement.  The mediators write down the solution which the parties agreed on, make sure that nobody wants any more changes and then ask the parties to sign the paper. Both parties receive a copy of the agreement. Depending on the complexity of the conflict and/or on the commitment the students show, the mediators can offer another meeting in one or two weeks.  The mediators thank the parties for their participation and their trust, wish them well and remind them (if agreed on) of the date of the follow-up session.

Sample for a contract:

Party A Party B
Mediator(s)
 
Type of conflict
On (date) we have voluntarily participated in a mediation process. This is the solution we both agreed on:
We accept the agreement.
Party A Party B
Mediator Mediator
Source:

  • Jamie Walker (Ed.), Mediation in der Schule, p. 204, revised by Beate Roggenbuck

8.7.9 New role play with all phases

Exercise,handout number Time Method Materials
Opening session 15 min Plenary
New Roleplay with all phases + evaluation in the working group 60 min + 10 min Dividing into working groups and 1 observer Role cards
Evaluation of all role plays 20 min Plenary
Collecting “wishes” for the last meeting 10 min Plenary

Handout 28: Role Play Andrew and Tim

Mediation training: Role Play Andrew and Tim

Instruction for implementation:

The facilitators ask the participants to form groups of 5. The role plays will be conducted parallel (make sure to have enough rooms or corners for undisturbed role playing).  The participants of each subgroup chose a role (2 mediators, Andrew, and Tim plus an observer). The trainers distribute the role descriptions and the guideline for observers.  The mediators receive some time to prepare the role play (setting, review of the guideline) while the parties are outside the room getting acquainted with their role. Then the mediators invite the parties and the observer to come in and start the role play.

Description of the problem for the mediators
Andrew  and Tim

Andrew and Tim attend the 7th class. They have been friends since Kindergarten. But today they had a quarrel during the morning break, calling each other names and screaming at each other. It has never been this bad before, normally their arguments don´t last very long and they make up soon but today  it is different. A teacher, Mr. Smith, has observed them and proposes to see the peer mediators.

Role description Andrew
Andrew and Tim

Andrew and Tim attend the 7th class. They have been friends since Kindergarten. But today they had a quarrel during the morning break, calling each other names and screaming at each other. It has never been this bad before, normally their arguments don´t last very long and they make up soon but today  it is different. A teacher, Mr. Smith, has observed them and proposes to see the peer mediators.

Andrew

Andrew is really mad at Tim. He is assuming that Tim was badmouthing him behind his back. He suspects that this is due to the fact that he missed a penalty kick in a soccer game. Soccer is very important for Tim and he always wants to win the game. But it was bad luck, Andrew didn´t miss on purpose.  He doesn´t understand why Tim cannot accept the fact that you sometimes lose a game and he is angry that Tim is talking behind his back. Andrew is willing to discuss the problem in a mediation.

Role description Tim
Andrew and Tim

Andrew and Tim attend the 7th class. They have been friends since Kindergarten. But today they had a quarrel during the morning break, calling each other names and screaming at each other. It has never been this bad before, normally their arguments don´t last very long and they make up soon but today  it is different. A teacher, Mr. Smith, has observed them and proposes to see the peer mediators.

Tim

Tim is upset about Andrew´s attitude. He missed the penalty kick and then he said that it was just a game and things like that happen without excusing himself.  For Tim, it is important to give one´s best in a soccer game. Tim complained about Andrew´s behavior in front of the other team members. Isn´t that allowed?  Why did he scream at him during the break? But since they have been friends for such a long time he agrees to attend a mediation.

8.7.10 Repetition, challenges and go for it

Exercise,handout number Time Method Materials
Opening session 15 min Plenary
Repetition of the phases and the challenges 30 min Dividing into groups Candies
Open questions, wishes  of the group 30 min Group work and presentation Flipchart paper, markers
Overall evaluation and sharing of sweets and chips or healthy food + Certificates 20 min Plenary Something to eat

Literature

Source:

  • Focus, Sind die bösen Jungs entschärft? 5.5.2014
  • Günther Gugel: Handbuch Gewaltprävention II, 2010
  • Programs to enhance the soft skills of students (prevention) became popular during the last 20 years in some European states (e.g. the Lions Quest concept, the “Friendly classroom” program, originally created in the USA or the buddy concept). Publications like “Gewaltfreier Umgang mit Konflikten in der Grundschule/Sekundarstufe I”   (Dealing nonviolently with conflicts in primary schools / high schools, author: Jamie Walker, 2013) have been studied and applied by teachers. However, it can also be stated that there are differences between European states concerning the spread of the usage of such programs.
  • More detailed information:  see instructions for school mediation at the end of the chapter: The five phases of school mediation
  • Jamie Walker, Mediation in der Schule, 2005, p. 11
  • Flyer: Mediation in Schools and No Blame Approach
  • Jamie Walker, ead. 2005, p. 25


10. Implementation

At the end of this Manual we would like to focus on some implementation advices which we learnt through our experimentation in the partner schools.

9.1 Introduction

The formats included in this handbook aims to be used with a group of students as a tool to reflect on cyberbullying through a creative and ludic process.
The formats were developed during the Summer Campus which took place in August 2015 in Udine, Italy. The Campus was one of the activities of the project “Joining forces to combat cyber bullying in schools” that aims to provide students with competent ways of handling digital media.
The Campus focused on the development of activities to carry out in schools and other educational institutions. The goal was to develop creative tools that can be used to raise the awareness for the topic of cyber bullying. One main point of the workshops was to reflect about the creative and competent handling of digital media and a responsible interaction on new social network platforms. The idea was to get a fresh look on the comprehensive topics cyber bullying and violence in social networks. During the Campus, creativity groups elaborated different contents in form of formats to promote a positive use of social media. This handbook provides some practical creative formats that can be applied in class. The formats were tested in classes of the partner countries.

10.1 Awareness rising and school involvement

The first goal is the active involvement of the whole school community

Our experience with the partner schools demonstrated how important it is to involve effectively the whole school community in the project goals.

It is not an easy task since it requires an high motivation and effort from all the school staff and the stakeholders reference people.

These are our extra-tips based on our implementation experience:

  • Make sure the Head Master and his direct collaborators are highly motivated on the project. On this purpose make sure that the project brings many positive (and visible) outcomes for the school (ex: high visibility on the media, positive reputation towards parents communities…). Without their high motivation the project will not give deep results.
  • Make sure that the teachers and school staff feel understood in their needs and prized in their effort. As far as possible, they should be actively involved in the project planning and appreciated in their competences which may be a value for the project (ex: active participation in previous project on similar topics, finding links between project topics and ordinary school subjects, special personal competences – ex. Multimedia and artistic skills). Avoid to make them feel the project is an other Top-Down project (as often happens).
  • Involve the representative of local communities as local NGO, social and health services, council and state authorities using focus group, media and public events to prize and underline their active involvement.
  • Involve the parents through parents associations, community network, sport associations and any other form of organized gathering which can include the parents.
  • In our experience we could clearly see how Parents are strategical actors in the promotion of the responsible use of digital media; in the same time they are the most difficult to reach and involve so that they may result as a weak point in the digital culture reinforcement process.

10. 2 Mediation club

Right timing for implementation in the schools

In many schools we could see how difficult it is to start the activities at the very start of the school year. A delay in the training start can be acceptable in many kind of project but when we come to “Mediation Club”, which may require a long training, we could realize how important it is to plan it in advance, possible at the end of the previous school year. In fact when the training has been completed too late in the school Year (ex: after the half term) the mediation club did not have enough time to operate and both students and teachers did not have enough time to touch visible outcomes of their activities.

Organize the trainings as early as possible (both multipliers and students ones) so that they can be completed as soon as possible (suggested: within 4 month from school start) and leave enough time for the mediation club to operate.

How to keep high motivation in the peer mediators

  • low number of actual mediations: most of mediation clubs could actually perform much less mediation then expected. This led to negative consequences on two levels:
    – mediators loose motivation
    – mediators could not practice so they loose part of their competences
    – we had no data to evaluate the effectiveness of this tool
  • mediation number should not be the only goal and indicator: it should be stated from the beginning that the number of mediations is not predictable at the beginning. To become fully operative in terms of mediations a mediation club may need up to 3 or 5 years (German Experience).
  • Other indicators should be considered as skills and competences acquired by partecipants and improving of general school climate
  • mediation club should have several different tasks: as a consequence of previous point it is important that the mediation club keep meeting on regular base after training even if there are lower or no mediations. They should therefore have different task as creative production, more role games,  discuss  cyberbullying cases with teachers and head masters…
  • head-master should promote strongly the mediation club through all teachers community
  • teachers support actions:  teachers leading the mediations club should be supported through further workshops, online tools, and experience’s exchange with other teacher in order to keep motivated, improve strategies and get through difficult problems

10.3 N.B.A.

Avoid misunderstandings about “Punishment Abolition”

In some countries and/or schools we found at the beginning a resistance to accept the core values of the N.B.A. approach. Specially we realized that some schools get the message that the N.B.A. method means “No Punishment” or “Punishment Abolition” and they find this unacceptable.

In fact this is not really neither a request nor a goal of the project. The Punishment are still possible and needed in some cases. The method aims instead to reduce the use Punishment and specially the public “Blame” of guilty students. But the main goal is not related to it but to the change in the behavior of the class group, including the main actors of the aggressive behaviours, promoting positive, pro-social and responsible behaviours  which can effectively improve the well-being of all the class members therefore prevent and reduce furthers negative conflicts among students.

To avoid  this misunderstanding we found very useful to make very clear this point  from very beginning with all the project stakeholders. In some cases we also find very effective to change the name of the method as happened in the UK where the name N.B.A. is not in use anymore for these very reasons (avoid useless misunderstaings). The name actually in use in UK is “Support group approach”).

Strategies to keep high motivation from teachers

  • low number of cases: in a single school year the trained teachers may have little chance to apply the N.B.A. technics since the bullying and cyberbulling cases may be (fortunately) few or none. In some cases (but not always) this led to small chance for the teachers to touch/see the benefits of this method and keep motivated.
  • therefore we suggest that the N.B.A. method should be used also as PREVENTION tool, when the teacher see the signals of a potential bullying situation. In this way they will have more chance to test the approach and keep trained and motivated (plus adding the extra-value of a prevention tool, which we could touch in the school where we test the N.B.A. as a prevention tool).
  • a wider range of prevention and intervention tools should be provided to teachers to enable them to act in diverse situations. One example is the well known technic of  “circle time” as a prevention tool that helps class to discuss together problems and personal needs before they can lead to deeper conflicts.
  • teachers support actions:  to keep motivated and updated we suggest that teachers involved in the N.B.A. approach should be supported through further workshops, online tools, and experience’s exchange with other teacher in order to see the results from the collegues experiences, keep motivated, improve strategies and get through difficult problems. Building local networks between the schools that join these activities and experimentation is highly suggested.

9.2 A question of perspective

New technologies bring with them familiar problems society faces, but they are appearing in new forms. Cyber bullying is one of these phenomena. In order to fight it, we need new ways of handling its problems and dangers. It is important to understand and grasp the complexity of virtual reality, the positive as well as the negative sides it is offering to users. When interacting and dealing with the topic of cyberbullying, and finally trying to bring about a change, it is crucial to open up a new perspective on the issue. Through the creative approach, the project aims to address a large audience from students to teachers and parents.
The developed formats are games to do in class. Games are characterized by collective activity and fulfill an important and useful social function. By following certain action processes and by taking the role of another person, students will get a new perspective on different ways of behavior, empathy and social roles. With creative contributions, students can be supported to acquire important skills in order to combat cyber bullying.

9.3 Creativity as an educational tool

Creativity in its various forms is a powerful resource to promote social change since a long time and can be described as an important tool and decisive factor when it comes to handling new phenomena on social networks like cyber bullying.
Projects promoting a creative approach encourage a deeper participation of students in a certain process. They learn to communicate about and deal with complex topics in a fun and playful way. Creative projects have the potential to reach and influence students in an easy way and set free a positive way of interaction with tools like social networks.
Furthermore, the transfer action is an important factor. Through producing creative content, one can reach peer groups in an entertaining way and transport a serious and important message through new forms.
An innovative, playful approach equips students with the capacity to open the point of view for other sides and possibilities, and they can imagine other contexts. Through this creative involvement, the critical thinking of students can be spread amongst friends and throughout the web. Therefore the creative approach can be described an important medium for dealing with social and cultural changes.

9.4 Preparing students for the workshops

In the practical work during the Summer Campus it became obvious that it is important to invest some time before the format is implemented in class in order to prepare the students for the activity.
We advise you to divide the class into different creativity groups in order to make sure that all student groups know their tasks and responsibilities. You can prepare the content for each group before the class is held. Obviously you can adapt all formats to your individual ideas and needs.

9.5 How to organise the creativity groups in class

Each creative format takes about two hours and is divided in different phases, each phase building on the previous step: after an introduction to the topic of the format, students elaborate their tasks in group work. They produce the content and finally all together you discuss, summarize and reflect on the elaborated results.
Before you will carry out the formats in class, you should take one lesson to contextualize the activity and introduce the topic of cyber bullying. Inform the students about the content and the results you want to obtain through elaborating the formats. Another lesson should be added after the implementation in class in order to draw a comprehensive summary and talk about the lesson learnt generally on the topic of cyber bullying.

Format n. 01 Mean comments

Aim:
Emphasize that cyber bullying is a serious matter, which has to be taken into consideration
Target group:
School class, pupils between 14 and 16 years old
Time:
2 h
Instructions:
1) Firstly, the pupils will be shown some similar videos on the topic. Then they decide on different locations where they would like to act and do their own videos. The pupils will create comments that will be read out loud in these videos.2) The multipliers will oversee the activity in the different locations at the same time, in order to reduce the duration of the activity.
3) In the end, we will share our experiences and emotions in a big circle and will watch the new videos together.
Schedule:
0 – 15 min: Introduction of the work, showing the “kids read mean tweets” video
15 – 30 min: Decide on the comments and the surroundings for video
30 – 80 min: Shoot the videos (in several places at once)
80 – 105 min: Edit the videos
105 – 115 min: Screening of the video
Multipliers:
At leat 2
Preparation:
Decide on the places for video recording, prepare comments, prepare technical resources
Equipment:
Several smartphones, one computer
PRO
– Students can decide on the places (this emphasizes that bullying happens everywhere, not only in school)
– Can be funny at the beginning, but serious at the endCONTRA
– Several smartphones are necessary
– Insults can be quite rude


Format n. 02 Screenplaying lab #1

Aim:

Make students understand that it is important to think over what they express in social networks, because this action has an impact on the others.

Target group:

School class, pupils between 15 and 16 year old.

Time:2 h
Instructions:

1) The multiplier shows the video that has been prepared during the workshop.

2) Then 3 groups will be created. The groups decide on the storyline and the script, and they can also choose the characters they will interpret. Then, with the ezvid program they create their videos. It might be necessary to shoot the video several times in order to succeed.

3) After that, the whole class sits in a circle, and pupils share their experiences and emotions. One member of each group edits the video, and at the end, we watch all the created videos together.

Schedule:

0 – 15 min: Introduction of the work

15 – 30 min: Decide on the storyline and the script, choose different roles

30 – 60 min: Acting

60 – 90 min: Discussion about experiences, during that one member of each groups edits the video

90 – 110 min: Showing of the video

Multipliers:At least 2
Preparation:

Download “ezvid” (editing program) to the computers, create a fake Facebook account

Equipment:

As many computers as groups are created, a few smartphones

PRO
– All students can take part- The program can be used easily- Interesting

CONTRA– Students have to use their own Facebook accounts- The video can be edited only by a few people

Format n. 03 Angel & devil

Aim:
The aim is to make pupils reflect about different situations and consider various aspects, to make them realise that cyber bullying is not at all a fun thing
Target group:
School class, pupils between 13 and 17 years old (adapt the seriousness of the questions to age)
Time:
2 h
Instructions:
1) First, the pupils will watch a short video prepared by the multiplier B in advance.
2) After that, the group will discuss the video in small groups, trying to make every participant speak and take part in an active way.
3) The most important part of the seminar will be the Angel/Devil game, where students will be given a situation, like: your friend asks you to break a classmates’ fb account just for fun. One part of the class will have to support this idea, trying to convince the others, while the second group has to come up with the drawbacks of the idea.
4) In the end the pupils will have to decide together which group is right, why and to what extent; they will be asked to evaluate the benefit of the game.
Schedule:
0 – 5 min: Introduction
5 – 10 min: Video (made by multiplier) – interview with questions
10 – 35 min: Group conversations – 3 groups with prepared questions
35 – 75 min: Situational games: “Convince the person to…”; aim: to create situations arousing different emotions based on questions such as “Should I break in someone’s Facebook account just for fun?” etc.
75 – 90 min: Conclusion and evaluation with the whole class: what was good/ bad/useful
Multipliers:
At least 2
Preparation:
Preparation of questions, different situations and video
Equipment:
Camera / smartphones
PRO
– Active involvement of pupils- Funny game
– Vivid discussion
CONTRA
– A lot of preparation needed
-The “devil” part could be the most enjoyable one (but this opens also interesting debates)

Format n. 04 Reality vs facebook

Aim:
The goal is to emphasize the different ways in which people can act on Facebook and in real life
Target group:
School class, pupils between 13 and 14 years old
Time:
2 h
Instructions:
1) First, the pupils will be given a picture which they shall describe to a classmate who cannot see it. After that, this classmate has to draw what he heard. The next one describes it again to another classmate, and so on. In the end, it is likely that the last picture will be very different from the original one.2) In the next activity, the pupils create a Facebook account and another one which represents real life. Both of them will be created on paper, to reflect on how people show another image of themselves online. They can create the two accounts next to each other in order to visualize the differences clearly. After discussing the experiences, the pupils will be given emoticons, which they can hand out to their peers.
Schedule:
0 – 5 min: Introduction of the first game
5 – 30 min: Play the first game, drawing of the topic they heard, and describe these pictures
(during the drawing part, multipliers could start making the emoticon pictures with the other students to use this time)
30 – 75 min: Start the second game, create two accounts on paper
75 – 90 min: Finish accounts, evaluate them together, talk about experiences
Multipliers:
At least 2
Preparation:
Printing emoticons for students
Equipment:
Printed emoticons, bringing paper, pens, pencils etc
PRO
– Fun action
– Interactive for students
– Pictures can be used in social media campaignCONTRA
– While someone is drawing, others can get bored
– Preparation of accounts can take a lot of time

Format n. 05 Tunnel

Aim:
Increase the empathy towards the topic of bullying, e.g. by experiencing the uncertainty of the role of the victim in a classroom.
Enhance a positive climate and communication through experience of positive opposite of victim-role
Target group:
School class, pupils between 12 and 16 years old
Time:
2h
Instructions:
1) Give each student a paper with “real” negative examples of chats, comments and posts found on social media. 

2) Then the students face each other in pairs, lined up in the fashion of a tunnel (with a gap of approx. 1m).
The first will start to go slowly through this tunnel of classmates with his/her eyes closed. While he/she goes through, every student who passed will regard him/her with the comment written on the paper he/she carries. When the student arrives at the end, he will line up at the end of the tunnel again and be the last bully of the next passing student, who will also line up, a.s.o.

3) Afterwards there will be time to discuss the information and discover further info about the topic of social media and cyberbullying and the experiences of the students.

4) Next, the pupils will have time to prepare a positive comment for EACH of their classmates by themselves (short but personal). As an orientation, the multipliers will provide some examples.
Then the same game will be played again, but more slowly and with eyes open.
Every student will experience the situation of receiving positive and individual feedback by every single classmate.

Schedule:
0 – 10 min: Introduction10 – 15 min: showing comments
15 – 20 min: Tunnel-Game
20 – 45min: Discussion, sharing of feedback
45 – 60 min: talk about social media and own experiences
60 – 85 min: prepare positive comments
85 – 90 min: play again
90 105 min: final discussion and overall feedback
Multipliers:
At least 1 (+ 1 assistent)
Preparation:
Pen and paper
Equipment:
Printed emoticons, bringing paper, pens, pencils etc
PRO
– Easy to implement for all kind of classes, groups and ages- Little efforts (little preparation, little material)
– Everybody experiences the role of bully and victim -> experience builds up awareness and sensitivity and may even change some behavior
– Great effect of second positive tunnel: for each single student, for the relationships as well as for the climate within the class
CONTRA
-Challenge to accompany action in a professional and empathic way -> multipliers need to be really fit and have a lot of patience and empathy

Format n. 06 Guess who?

Aim:
10 1. Students reflect on how they want to present themselves in social networks and how others might see them.
Target group:
School class, pupils between 12 and 16 years old
Time:
3h, better would be dividing it on more days
Instructions:
The workshop is divided in 3 different steps: 1) Warm Up 2) Group work and presentation of results 3)discussion/evaluation.1) Warm-Up:
– Photo shoot with different materials (moustache, glasses, figs, hats, etc.); Question: how do you want to look like? Which image do you want to give?
– After the photo shoot, other mates comment (prepared comments available or blank paper) or give a like (prepared “thumb up”) and stick it to the person
– Sharing of experiences: Everybody says in one word/sentence what he/she wanted to express with the new look and how it was seen by the others2) Group work (differentiated learning): students can choose freely which small group they would like to attend. If there is one group many students want to join, it is possible that two small groups work on the same topic. If one group is of no interest for anyone, simply leave it out.
– Create a fake profile:
*Set up a blank profile; give login data to students who can spread the profile on social media with friends; they could also add things themselves
* Only students of that group create a fake profile
– Internet research about public figures who shared something and afterwards needed to deal with a “shitstorm”
– Photo manipulation: workshop with a simple photo app (to be or to pretend to be)
– Journalists: observe the other groups, take pictures, report about their progress

After 1 hour, all groups come together again and every group presents their results. The journalists have the role to summarize first, groups add.

3) Discussion
– Students share their feelings/emotions they experienced during the group work.
-Multiplier summarizes in the end and concludes

Schedule:
0 – 15 min: Welcoming students, Introduction, explanation of warm up15 – 35 min: Warm Up
35 – 45 min: Group work introduction
45 – 105 min: Group work
105 – 135 min: Presentation of results
135 – 150 min: Break
150 – 180 min: Discussion
180 min: Conclusion, summarizing
Multipliers:
at least 2, better more
Preparation:
Collect materials for photo shoot; preparation of tasks for groups (short summary for every group); create fake profile (only login data); prepare questions for final discussion (open questions, to reflect on process)
Equipment:
Smartphones/computers, at least one per group; materials for photo shoot (beards, figs, hats, glasses, etc.); cameras for journalists (possible: smartphones); Wi-Fi/hotspot (allow Social Network Sites)
PRO
– Flexible approach: group work is orientated on interests of students- Interactive: students have an active role and influence the direction
– Diverse activities, no boredomCONTRA
– Takes a lot of time to prepare as well as in class
– More than one room is needed
-Workshop depends very much on action of students

Format n. 07 Show your face

Aim:
Try to raise awareness of pupils and encourage them to share their personal statements against cyber bullying. International level in sharing the final result. Contribution from every pupil to reach the positive outcome.
Target group:
School class, pupils between 12 and 16 years old
Time:
3h, better would be dividing it on more days
Instructions:
1) The multiplier(s) gives introduction to the class about the topic and the activities (1h).Interview that asks a concrete question (“What do you do if…”) and gets a direct statement (“I will…”and “I will not…”) as a result.

2) Photo shoot of faces and statements that will be written on boards in the shape of chat bubbles, each one with a different colour. Pupils will have the possibility to express their creativity by organising a workshop (together with their teachers) to create attractive and impressive backgrounds for the shoots. The photos will be collected and set in a form of collage on one or more posters, or including only one person´s face, or faces of the whole class. An extra option could be producing audio/video formats with strong messages related to avoid cyber bullying statements.

3) Pupils will post pictures they made on the German Facebook Page of the project. Pictures and video/audio materials will be used later for social media channels.
The workshop can be implemented in other schools in the region, and even in other countries. This will bring the spirit of belonging to a wide community involved in the same topic. Afterwards it is possible to make an international collage with the same strong message.

Schedule:
0 – 60 min: Introduction of the work and topic, interview, workshops
60 – 90 min: Statements and photo shoot90 – 120 min: Photos, posting on the page
120 min: Evaluation, discussion
Multipliers:
at least 2
Preparation:
Prepare the introduction of the activities
Equipment:
Smartphone for each student, if possible professional equipment
PRO
– Interactive- International- Good for big or small groups
– Can go viral
CONTRA
-Amount of time

Format n. 08 Developed by: DE Title: social game

Aim:
Try to understand the different roles that occur in a cyber bullying task, enter in empathy in different situations
Target group:
School class, pupils between 12 and 16 years old
Time:
2,5 h
Instructions:
1) The multiplier hands out a card to each participant in which his/her character role is described. Then, through a WhatsApp chat, each participant acts his part with the group. Another student will film the display of the mobile. After ten minutes, the roles are changed.

2) In the second part of the lesson there will be a discussion with the multiplier in order to understand what each student felt during the activity. A final video will be edited and presented to the classroom.

Schedule:
0 – 15 min: Introduction of the work15 – 30 min: Giving the cards to participants
30 – 45 min: Acting (first part)
45 – 60 min: Acting (second part)
60 – 75 min: Discussion
75 – 105 min: Editing of the video
105 min: Showing of the video
Multipliers:
At least 2
Preparation:
Prepare the cards, prepare a pre-edited video template
Equipment:
Smartphone for each student
PRO
– Interactive- Including pupils
CONTRA
-Amount of time

Format n. Guess who? #1

Aim:
Think about the virtual representation of individuals on profiles of social networks
Target group:
School class, pupils between 12 and 16 years old
Time:
2 h
Instructions:
The activity aims to reflect on the difference between an individual and its image that his/her social profile gives about him/her, through a practical activity that asks pupils to use some of their recent Facebook posts.1) Firstly, they will transcribe them on paper.

2) Then, the posts will be mixed and each student will have to assign the posts to the matching profile on a board set up in the classroom. Pupils could also assign some “likes” to the posts they prefer. The whole activity is done in an anonymous way, and the pupils don’t really know the author of each post.

3) At the end, the multiplier B will conduct an evaluation of the results to analyze the content, asking the pupils if they feel themselves represented by their profile.

Schedule:
0 – 15 min: Introduction of the activity15 – 30 min: Ask each student to copy the last 5 posts of his/her Facebook profile and write them on paper
30 – 45 min: Hand the written post in a closed envelope over to another pupil and ask him to mix in final cards similar to Facebook posts (to maintain anonymity)
45 – 60 min: Give to each participant five posts randomly chosen, asking them to attach to a board connecting them to the profile of each participant
60 – 75 min: Each participant can put five “like” symbols to the posts he prefer (ev. stickers)
75 – 90 min: Short statistic evaluation in order to understand to whom the post on the board belongs to.
90 – 110 min: Final discussion: Do profiles on social network really reflect your personality?
Multipliers:
At least 2
Preparation:
Facebook cards, board, “like” – stickers
Equipment:
Each pupil must have a smartphone
PRO
– Practical activity- Critical reflection on the content published as a postCONTRA
-Risk that some pupils could not have a Facebook profile and they have to invent the posts

Format n. 10 Radio show

Aim:
Using the audio/radio medium to make pupils think about the topic of cyber bullying in a fun and simple way.
Target group:
School class, pupils between 12 and 16 years old
Time:
2 h
Instructions:
1) Give basic information about cyber bullying and understand what they already know about this topic, trough a participative and dynamic way of work.

2) Make a short brainstorming/identikit about the personality of the bully, useful to create a collective story. All the scenes will be used to compose the story of the podcast. Every pupil will have the task to complete the scenes using his/her imagination, using an incipit given by the multiplier.3) Record the story in one take. The story will be told by the voice of the pupils, choose some sound effects and/or a theme song. In the end will be created a live audio editing to improve the pupil’s awareness of the phenomenon.

3) Record the story in one take. The story will be told by the voice of the pupils, choose some sound effects and/or a theme song. In the end will be created a live audio editing to improve the pupil’s awareness of the phenomenon.

Schedule:
0 – 20 min: Introduction and brainstorming20 – 35 min: Identikit & brainstorming about the bully
35 – 60 min: Write the story
60 – 70 min: Recording
70 – 90 min: Live audio editing
Multipliers:
At least 2
Preparation:
Download the audio software (Audacity or any other), download some sound effects (www.freesound.org), bring paper
Equipment:
Computer, audio software
PRO
– Fun activity, easy to involve the pupils- Brainstorming is useful as an ice-breaking activity- Combination of various activities (visual, writing, audio recording)CONTRA
– Computer needed, some technical skills needed
-Risk to not have enough time

Format n. 11 From social to visual

Aim:
Focus on the different social network structures and the relational forms that they engage. Develop awareness on the cyber bullying topic.
Target group:
School class, pupils between 12 and 16 years old
Time:
2 h
Instructions:
1) The multiplier hands out a script to each participant which has been previously prepared. This script is based on real discussions or posts found in the web (Ask.fm, Facebook).

2) Each pupil gets a script and has to play one of its roles. One pupil will be the cameraman, the others the actors.3) For the ask.fm format there will be one close-up of the actor who has to answer. Behind him the other actors will alternate, and one after the other will read the script.

3) For the ask.fm format there will be one close-up of the actor who has to answer. Behind him the other actors will alternate, and one after the other will read the script.

4) For the Facebook format, in the beginning there will be a close up of the actor who “publishes a post” and then through a tracking shot the other actors (they are standing in front of him) will enter in the framing reading the “comments of the post”.

Schedule:
0 – 15 min: Introduction of the work15 – 30 min: Hand over the script to the pupils
30 – 60 min: Acting (Ask.fm format)
60 – 90 min: Acting (Facebook format)
90 – 105 min: Screening the video
105 – 120 min: Discussion
Multipliers:
At least 2
Preparation:
Prepare the scripts
Equipment:
One smartphone and a swivel chair for the tracking shot.A beamer and a computer for the screening.
PRO
– High interaction between pupils- Improve the awareness on the use of social networks and on the cyber bullying topic- Improvement of the students creative approach through a “translation/ transfer” processCONTRA
– Difficulty in keeping an active and concentrated atmosphere
-Risk of emulation

Format n. 12 Social game

Aim:
Try to understand the different roles that emerge in a cyber bullying action, establish empathy with the different actors.
Target group:
School class, pupils between 12 and 16 years old
Time:
2 h (plus 10 min. preparation)
Instructions:
1) The multiplier gives a card to each participant on which his/her character is described.Then, through a whatsapp chat, each participant acts individually within the group. Another pupil will film this interaction on the display of the mobile phone. After ten minutes the participants change roles.

2) In the second part of the lesson there will be a discussion with the multiplier in order to discuss together what each pupil felt during the activity.3) A final video that shows the interactions will be edited, cut together and presented to the class

3) A final video that shows the interactions will be edited, cut together and presented to the class

Schedule:
0 – 15 min: Introduction of the work15 – 30 min: Give prepared cards to the pupils
30 – 45 min: Acting (first part)
45 – 60 min: Acting (second part)
60 – 80 min: Discussion
80 – 100 min: Edit the video
100 – 120 min: Screen the video
Multipliers:
At least 2
Preparation:
Prepare the cards, prepare edited video templates
Equipment:
A smartphone for each pupil.
PRO
– Interactive, easy to involve the pupils- Reflect about different positions and power- Improvement of the students creative approach through a “translation/ transfer” processCONTRA
Risk of emulation

Format n. 13 Transfer lab

Aim: The aim of this exercise is to show participants that anyone can become a victim of cyber bullying and that there doesn’t necessarily have to be a reason for such behavior.
Target group:
School class, pupils between 12 and 16 years old
Time:
2 h
Instructions:
The participants (separated into groups) will have to search the internet for authentic comments made by “cyber-bullies”. These texts will then be read by each participant (who will play the role of the victim) whilst being recorded.
Schedule:
0 – 5 min: Introduction
5 – 25 min: Searching the internet for negative comments and assigning texts per participant
25 – 35 min: Participants will spend this time preparing by memorizing texts (should they be willing) and setting up the scene
35 – 75 min: Recording (we’re assuming that this part may be repeated a couple of times)
75 – 95 min: Post-production (editing the film…)
95 – 110 min: Show time!
110 – 120 min: Discussion about the films made by each and a final reflection of each workshop (this is planned to be the last workshop)
Multipliers:
2
Preparation:
– Prepare an emergency list containing the cyber bullying examples
– Point out to the participants that they will be recorded (possibly gain parental consent before this workshop)
Equipment:
– Recording device (camera, mobile phone…)
– Computer with a projector
– IT room
PRO
– Participants can enter this role and develop a deeper understanding of the situation from the victims’ point of view
CONTRA
– It is almost certain that vulgar phrases will be found-Limited time frame

Format n. 14 Screenplaying lab #2

Aim:
Through role playing, the participants will draw conclusions of how to react in a situation in which cyber bullying occurs.
Target group:
School class, pupils between 13 and 16 years old
Time:
2h
Instructions:
The participants are split into different groups where they will be assigned particular roles (victim, bully or observer). The participants will then have to create a fake profile on paper. Next, the participants will perform the situation, using post-it notes as a conversation between the different roles.
Schedule:
0 – 20 min: Introduction
20 – 30 min: Splitting into groups, assigning into roles and creating the fake profiles
30 – 60 min: Preparing the „conversation”
60 – 90 min: Recording each “conversation” and watching each film
90 – 110 min: Discussion – the participants will be asked to see when the hurtful comments started
110 – 120 min: Conclusion – discussion of how to avoid such scenarios
Multipliers:
2 (possibly more)
Preparation:
Point out to the participants that they will be recorded (possibly gain parental consent before this workshop)
Equipment:
– Post-it notes- Pens & paper- Recording device (camera…)
– Projector
PRO
– Allows the participants to be creativeCONTRA
The workshop doesn’t completely reflect the reality of cyber bullying in social

Format n. 15 Audio lab #1

Aim:
20 This workshop is aimed to raise the participants’ awareness of the problems created through cyber bullying and to make each participant reflect upon the matter. The final aim is for each participant to come up with their own definition of cyberbullying.
Target group:
School class, pupils between 13 and 16 years old
Time:
2h
Instructions:
1) One activity will involve splitting the participants into groups and having them throw a ball between them. The person who catches the ball has to come up with a word/phrase involving cyberbullying. From these words, a Mindmap will be created (ideally, each word/phrase will be classified into a certain category).
2) The participants will be split into groups. Within these groups, they will be asked to come up with questions involving cyberbullying. Next, the participants will be recorded as each group asks the others their questions (similar to the way reporters ask questions).
Schedule:
0 – 10 min: Introduction
10 – 20 min: Warm up: throw the ball and come up with words/phrases that involve cyberbullying
20 – 40 min: Create the Mindmap
40 – 60 min: Split the participants into 2 groups where they will formulate questions for the “interview”
60 – 80 min: Record the responses to different questions
80 – 100 min: Replay the answers back to the participants
100 – 120 min: Discussion and conclusion
Multipliers:
2
Preparation:
Possibly prepare categories in order to classify words/phrases
Equipment:
– Ball(s)
– Paper for the Mindmap & pens
– Recording device
PRO
– Role-playing
– The answers could be shared with the general public
CONTRA
-The amount of time spent on each activity depends on the dynamic of each group and the enthusiasm of the participants

Format n. 16 Guess who #2

Aim: The aim of this exercise is to remove stereotypes, whilst showing the participants how social portals such as Facebook or Twitter can create an illusion.
Target group:
School class, pupils between 13 and 16 years old
Time:
2h
Instructions:
1) The participants are divided into groups, where they will be assigned particular figures (eg. The Barbie Doll, The Sportsperson…).

2) Each group has to create a fake profile for their figure, posting photos/ films/comments…

3) The groups will then switch profiles, discussing whether they believe the profile is realistic or not – this should provoke a discussion as the Multipliers B will suggest other reasons for a person to present themselves in a particular way (perhaps the Sportsperson isn’t physically active and just holds a great interest in Sports/Healthy lifestyle…)
4) Conclusion

Schedule:
0 – 10 min: Introduction
10 – 20 min: Divide participants into groups and assign them particular characters
20 – 50 min: Participants create the fake profiles
50 – 75 min: Switch profiles and analyse them
75 – 100 min: Discussion
100 – 120 min: Conclusion
Multipliers:
2
Preparation:
The different personality types need to be prepared – the number of figures depends on the number of groups.
Equipment:
Computers
PRO
– This workshop allows the participants to work within teams, whilst being creative- It also allows the participants to reflect upon the reality of social profiles
CONTRA
-Participants may assume that everything/everyone in social profiles is false

Format n. 17 Post-it film

Aim:
The aim is to understand the different roles that exist in cyber bullying, to develop empathy in different situations, to use creative writing and develop an artistic use of multimedia to reflect on difficulties that youth faces, and to gain new competences
Target group:
School class, pupils between 11 and 16 years old
Time:
2h
Instructions:
1) Start with showing a motivational video and a short explanation about the format.
2) Then the pupils put together a story, using the word-collage game (through brainstorming).3) The pupils afterwards write the dialogues based on the game results, and write down the posts on post-its.
4) The preparation for the video recording follows: select the appropriate music, logistics on film-set (defining roles, stick post-its on the wall).
5) Recording with photo camera, add music.
6) Final discussion after screening of the produced video.
Schedule:
0 – 10 min: Introduction: motivational video and short explanation
10 – 30 min: Word collage – putting together a story
30 – 45 min: Writing post-its, using the story created in the game
45 – 55 min: Preparing of the video recording – division of different roles, select appropriate music
55 – 75 min: Discussion
75 – 90 min: Filming
90 – 105 min: Presentation of the video
105 – 120 min: Discussion
Multipliers:
At least 2
Preparation:
Bring post-its, define some key words for game
Equipment:
Computers
PRO
– Simple, not too much technology needed- Fun- Use of all senses
– Can be done quickly

CONTRA
– Use of swear words, might not take bullying seriously
-Pupils must be divided into several groups of max. 5 or 6 so that they all can engage in the preparation of the video

Format n. 18 Guess who #3

Aim:
Make the students aware of the visual manipulation through media
Target group:
School class, pupils between 12 and 16 years old
Time:
2h
Instructions:
1) Introduction
2) Puzzle (jigsaw) – Confrontation of two pictures of the same person: one with make-up/photo shopped, the other one without make up/not photoshopped. This confrontation will help pupils to understand the common use of visual manipulation of reality in media
3) Pictionary: in groups of 4, the students draw the picture of a profile. In the end of the activity, they compare the original with the edited results. Understanding that everyone has a different perception, distortion of reality through different media
4) Conclusion with a final discussion sitting in a circle where everyone shares their impressions, while multiplier B moderates the process
Schedule:
0 – 10 min: Introduction
10 – 40 min: Puzzle – photoshopped and not photoshopped pictures
40 – 85 min: Pictionary- understanding that everyone has different perceptions,
distortion of reality through different media
85 – 100 min: Final discussion: sitting in a circle – everyone shares their impressions
Multipliers:
At least 2
Preparation:
Photoshopped pictures, searching images
Equipment:
Computer, Program Photoshop, paper, pencils, printed edited and non-edited pictures of celebrities
PRO
– Flexible- Interactive- It can be upgraded by making a stop-motion version of putting the puzzles togetherCONTRA
-If warm up is not effective there will be a problem understanding the aim

Format n. 19 Audio lab #2

Aim:
Try to recompose a song with new lyrics with an anti cyber bullying content; pupils become more involved and empathetic with the victims of cyber bulling.Achieve through this action a critical reflection on society, where an individual can be cast into shame because of his diversity.
Target group:
School class, pupils between 12 and 16 years old
Time:
2h
Instructions:
1) Brainstorming: Two groups of pupils reflect about social media, record the process2) Story: creating a story one word at a time on the topic of cyber bullying in groups of five people each3) Create a poem about the bully/victim
4) Song lyrics – famous song with the words changed
5) Audio story
Schedule:
0 – 10 min: Warm-up and getting to know each other through a game (creating meaningful creative sentences in a way that everybody says one word)
10 – 20 min: Introduction into topic of cyber bullying (show motivational video + PPT on topic)
20 – 25 min: Divide class into groups, instructions for the groups
25 – 50 min: Groups select one piece of music from Karaoke list that they like or find funny; write lyrics; adapt lyrics so that it reflects on why youngsters use cyber conversation and show what can happen when doing that
50 – 60 min: Record the song
60 – 75 min: Edit the song
75 – 90 min: Listen to all songs and comment on the results
90 – 105 min: Final discussion on the outcomes and the cyber bullying topic
Multipliers:
At least 2
Preparation:
Research on modern music, Karaoke list, short presentation on cyber bulling
Equipment:
Computer or projector for screening of video, internet, recording device, papers, pencils
PRO
– Encourages critical observation, imagination, music and writing skills- The lyrics can avoid using defamatory language by finding other, more poetic solutions for describing the victim

CONTRA
– Rift between the students which music is cool enough to work on
– Can lead to usage of inappropriate words if the moderators don`t pay attention